目前最新版本是Spring6,此版本暂且停止更新
Spring 5 1. Spring Concepts 基本概念 Spring 是轻量级的开源的 JavaEE 框架
Spring 可以解决企业应用开发的复杂性
Spring 有两个核心部分:IOC 和 Aop
Spring 特点
方便解耦,简化开发
Aop 编程支持
方便程序测试
方便和其他框架进行整合
方便进行事务操作
降低 API 开发难度
入门案例
创建普通Java工程
导入Spring5相关jar包
创建普通类和普通返回方法
创建Spring配置文件,在配置文件里创建对象,配置文件是.xml格式
1
2
3
4
5
6
7
8
9
10
<?xml version="1.0" encoding="UTF-8" ?> <beans xmlns ="http://www.springframework.org/schema/beans" xmlns:xsi ="http://www.w3.org/2001/XMLSchema-instance" xmlns:p ="http://www.springframework.org/schema/p" xsi:schemaLocation ="http://www.springframework.org/schema/beans http://www.springframework.org/schema/beans/spring-beans.xsd" > <bean id ="user" class ="com.Jancoyan.spring.User" > </bean > </beans >
编写测试代码
2. IOC 2.1 IOC 底层原理 什么是 IOC (1)控制反转,把对象创建和对象之间的调用过程,交给 Spring 进行管理
(2)使用 IOC 目的:为了耦合度降低
(3)做入门案例就是 IOC 实现
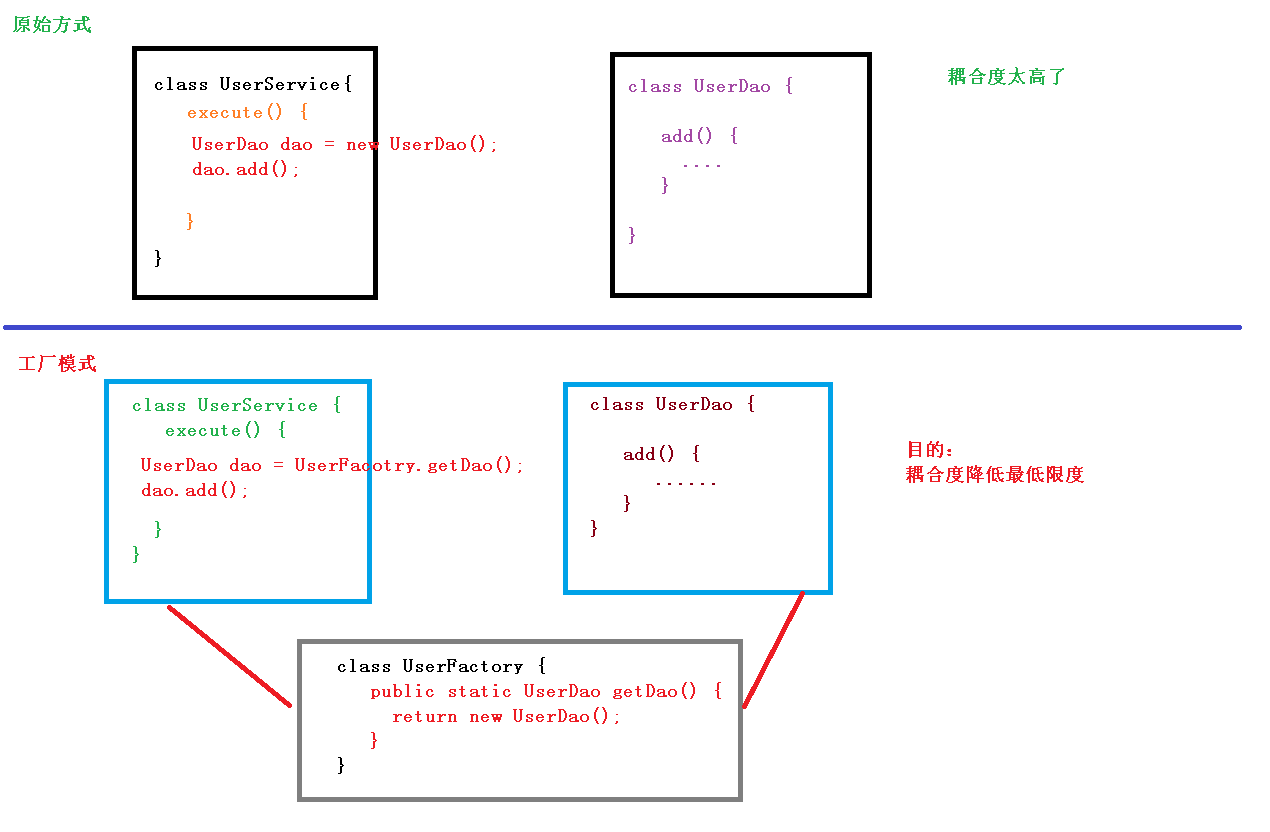
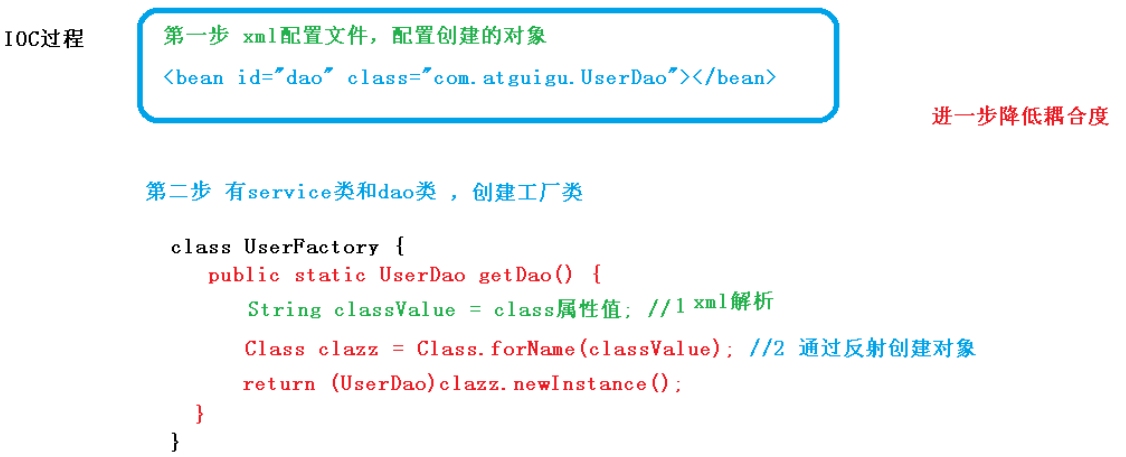
底层原理 xml解析、工厂模式、反射
工厂模式:
IOC过程
2.2 IOC 接口(BeanFactory) 1、IOC 思想基于 IOC 容器完成,IOC 容器底层就是对象工厂
2、Spring 提供 IOC 容器实现两种方式:(两个接口)
BeanFactory:IOC 容器基本实现,是 Spring 内部的使用接口,不提供 开发人进行使用。加载配置文件时候不会创建对象,在获取对象(使用)才去创建对象
ApplicationContext:BeanFactory 接口的子接口,提供更多更强大的功能,一般由开发人 员进行使用。加载配置文件时候就会把在配置文件对象进行创建【这种方式比较好,因为在web项目中我们推荐把耗费时间和资源的操作在项目启动的时候进行处理,节约时间而不是节约空间】
2.3 IOC 操作 Bean 管理(基于 xml) Bean管理指的是两个操作 : Spring 创建对象、Spring注入属性
Bean管理操作由两种方式实现: 基于XML配置文件实现、基于注解实现
创建对象
1
2
3
// bean.xml <bean id ="user" class ="com.Jancoyan.spring.User" > </bean >
方式:
在Spring配置文件中,使用bean标签,标签里面添加对应属性,就可以实现对象创建
在 bean 标签有很多属性,介绍常用的属性
id : 唯一的标识,在获取实例的时候将id传入User user = context.getBean("user", User.class);
class :类的全路径(也就是包的路径)
创建对象的时候,默认 执行无参构造 完成对象的创建(没有无参构造就会报错)
基于XML注入属性 DI:依赖注入(注入属性),需要在创建对象的基础之上完成
set函数进行注入
创建类,定义属性和set方法(最原始的方法,不再演示)
在 spring 配置文件配置对象创建,配置属性注入
1 2 3 4 5 6 <bean id ="user" class ="com.Jancoyan.spring.User" > <property name ="name" value ="张三" > </property > <property name ="age" value ="15" > </property > </bean >
有参构造进行注入
使用有参构造创建类(最原始的方法,不再演示)
在spring配置文件中进行配置
1 2 3 4 5 6 <bean id ="user" class ="com.Jancoyan.spring.User" > <constructor-arg name ="name" value ="张三" > </constructor-arg > <constructor-arg name ="age" value ="15" > </constructor-arg > </bean >
其他类型的XML注入
字面量
null值
1 2 3 <property name ="name" > <null /> </property >
属性值包含特殊符号,比如 引号
转义 <&dt等
写道CDATA中
1 2 3 4 <property name ="name" > <value > <![CDATA["张三"]]></value > </property >
注入属性 - 外部bean
直接new外部bean的对象UserDao userDao = new UserDaoImpl(); (传统方法不再演示)
在xml文件中配置后注入(有参构造或者set) 1 2 3 4 5 6 7 8 9 10 <bean id ="userService" class ="com.Jancoyan.spring.service.UserService" > <property name ="userDao" ref ="userDaoImpl" > </property > </bean > <bean id ="userDaoImpl" class ="com.Jancoyan.spring.dao.UserDaoImpl" > </bean >
注入属性 - 内部bean
一对多的关系(一个部门多个员工,一个员工一个部门)
1 2 3 4 5 6 7 8 9 10 11 12 <bean id ="emp" class ="com.Jancoyan.spring.bean.Employee" > <property name ="name" value ="lisi" > </property > <property name ="gender" value ="nan" > </property > <property name ="dept" > <bean id ="dept" class ="com.Jancoyan.spring.bean.Dept" > <property name ="dname" value ="HR" > </property > </bean > </property > </bean >
注入属性 - 级联bean
使用ref属性关联外部的bean
1 2 3 4 5 6 7 8 9 10 11 <bean id ="emp" class ="com.Jancoyan.spring.bean.Employee" > <property name ="name" value ="lisi" > </property > <property name ="gender" value ="nan" > </property > <property name ="dept" ref ="dept" > </property > </bean > <bean id ="dept" class ="com.Jancoyan.spring.bean.Dept" > <property name ="dname" value ="HR" > </property > </bean >
IOC操作Bean管理,xml注入集合属性
第一种方法都是直接用set方法进行赋值,不再演示,以下是xml配置属性
1 2 3 4 5 6 7 8 9 10 11 12 13 14 15 16 17 18 19 20 21 22 23 24 25 26 27 28 29 30 <bean id ="stu" class ="com.Jancoyan.spring.sets.Stu" > <property name ="courses" > <array > <value > Java</value > <value > Oracle</value > </array > </property > <property name ="list" > <list > <value > 张三</value > <value > 小三子</value > </list > </property > <property name ="map" > <map > <entry key ="Java" value ="java" > </entry > <entry key ="MySQL" value ="mysql" > </entry > </map > </property > <property name ="set" > <set > <value > Java</value > <value > Python</value > </set > </property > </bean >
提出问题:
在集合中设置对象类型的值
1 2 3 4 5 6 7 8 9 10 11 12 13 14 15 16 17 18 19 20 <bean id ="stu" class ="com.Jancoyan.spring.sets.Stu" > <property name ="list" > <list > <ref bean ="java" > </ref > <ref bean ="python" > </ref > </list > </property > </bean > <bean id ="java" class ="com.Jancoyan.spring.sets.Course" > <property name ="name" value ="JAVA" > </property > <property name ="id" value ="1" > </property > </bean > <bean id ="python" class ="com.Jancoyan.spring.sets.Course" > <property name ="name" value ="PYTHON" > </property > <property name ="id" value ="2" > </property > </bean >
提取集合注入部分
首先修改beans标签
1 2 3 4 5 6 7 8 9 <?xml version="1.0" encoding="UTF-8" ?> <beans xmlns ="http://www.springframework.org/schema/beans" xmlns:xsi ="http://www.w3.org/2001/XMLSchema-instance" xmlns:p ="http://www.springframework.org/schema/p" xmlns:util ="http://www.springframework.org/schema/util" xsi:schemaLocation ="http://www.springframework.org/schema/beans http://www.springframework.org/schema/beans/spring-beans.xsd http://www.springframework.org/schema/util http://www.springframework.org/schema/util/spring-util.xsd" >
配置文件配置方式:
先用util相关标签设置属性, 再用ref进行引用
1 2 3 4 5 6 7 8 <util:list id ="bookList" > <value > 斗罗大陆</value > <value > 斗破苍穹</value > </util:list > <bean name ="book" class ="com.Jancoyan.spring.bean.Book" > <property name ="name" ref ="bookList" > </property > </bean >
FactoryBean Spring有两种类型的bean, 一种事普通bean,另一种是工厂bean
普通bean:在配置文件中定义的bean类型就是返回类型
工厂bean:在配置文件中定义的bean类型可以和返回类型不一样,具体返回内容在接口实现中的getObject中进行定义。
1 2 3 4 5 6 7 8 9 10 11 12 13 14 15 16 17 18 19 public class MyBean implements FactoryBean <Book> { @Override public Book getObject () throws Exception { Book book = new Book (); book.setName(Collections.singletonList("<Hello>" )); return book; } } <bean name="myBean" class="com.Jancoyan.spring.Factory.MyBean" ></bean> ApplicationContext context = new ClassPathXmlApplicationContext ("bean.xml" );Book book = context.getBean("myBean" , Book.class);
bean的作用域 在Spring里面设置创建的bean是单实例还是多实例(默认是单实例,也就是说,每一次用bean获取实例的时候都是获取的同一个实例对象),如何设置多实例还是单实例?
在配置文件的bean标签中通过设置属性 scope 进行设置
singleton : 默认,单实例,加载配置文件 的时候就会加载单实例对象。
prototype:手动设置,多实例,在调用getBean方法 的时候创建多实例对象。
bean生命周期
通过构造器创建bean实例(无参构造)
为bean的属性设置值和对其他bean的引用(调用set方法)
调用bean的初始化方法(需要进行配置)
配置初始化方法:设置bean标签的init-method属性值为初始化方法名
bean可以使用(对象获取到了)
当容器关闭的时候,调用bean的销毁方法(需要自己配置销毁方法)
配置销毁方法:设置bean标签的destory-method值为销毁方法名
加上bean的后置处理器之后,生命周期变为7步
通过构造器创建bean实例(无参构造)
为bean的属性设置值和对其他bean的引用(调用set方法)
把bean的实例传递bean后置处理器的方法
调用bean的初始化方法(需要进行配置)
配置初始化方法:设置bean标签的init-method属性值为初始化方法名
把bean的实例传递bean后置处理器的方法
bean可以使用(对象获取到了)
当容器关闭的时候,调用bean的销毁方法(需要自己配置销毁方法)
配置销毁方法:设置bean标签的destory-method值为销毁方法名
在初始化之前和之后会分别将bean传给后置处理器,后置处理器会对所有配置文件中的bean进行后置处理器的添加。
后置处理器实现:写一个类继承BeanPostProcessor 并Override里面的两个方法,然后在配置文件中写上这个类的bean,spring会自动将其识别为后置处理器(因为实现了BeanPostProcessor接口)
1 2 3 4 5 6 7 8 9 10 public class MyBeanPost implements BeanPostProcessor { @Override public Object postProcessBeforeInitialization (Object bean, String beanName) throws BeansException { return bean; } @Override public Object postProcessAfterInitialization (Object bean, String beanName) throws BeansException { return bean; } }
1 <bean name ="myBeanPost" class ="com.Jancoyan.spring.Factory.MyBean" > </bean >
xml方式的自动装配 手动装配:在xml配置文件中bean中设置property标签,手动设置值
自动装配:根据指定的装配规则(属性名称或者属性类型),Spring自动将匹配的属性值进行注入
在实际开发中使用比较少, 不再演示
引入外部属性文件(数据库配置)
直接配置数据库信息
配置德鲁伊连接池
引入德鲁伊连接池的jar包druid.jar
1 2 3 4 5 6 7 <bean id ="dataSource" class ="com.alibaba.druid.pool.DruidDataSource" > <property name ="driverClassName" value ="com.mysql.jdbc.Driver" > </property > <property name ="url" value ="jdbc:mysql://localhost:3306/userDb" ></property > <property name ="username" value ="root" > </property > <property name ="password" value ="root" > </property > </bean >
引入外部属性文件配置数据库连接池
创建外部属性文件,properties文件,写数据库信息(键值对的方式写数据库信息)
把外部的properties属性文件引入到spring文件中,引入context名称空间。
1 2 3 4 5 6 7 8 9 10 <beans xmlns ="http://www.springframework.org/schema/beans" xmlns:xsi ="http://www.w3.org/2001/XMLSchema-instance" xmlns:p ="http://www.springframework.org/schema/p" xmlns:util ="http://www.springframework.org/schema/util" xmlns:context ="http://www.springframework.org/schema/context" xsi:schemaLocation ="http://www.springframework.org/schema/beans http://www.springframework.org/schema/beans/spring-beans.xsd http://www.springframework.org/schema/util http://www.springframework.org/schema/util/spring-util.xsd http://www.springframework.org/schema/context http://www.springframework.org/schema/context/spring-context.xsd" >
然后在spring配置文件中使用标签引入外部属性文件
1 2 3 4 5 6 7 8 9 <context:property-placeholder location ="classpath:jdbc.properties" /> <bean id ="dataSource" class ="com.alibaba.druid.pool.DruidDataSource" > <property name ="driverClassName" value ="${prop.driverClass}" > </property > <property name ="url" value ="${prop.url}" > </property > <property name ="username" value ="${prop.userName}" > </property > <property name ="password" value ="${prop.password}" > </property > </bean >
2.4 IOC 操作 Bean 管理(基于注解) 什么是注解
注解是代码特殊标记,格式:@注解名称(属性名称=属性值, 属性名称=属性值..)
使用注解,注解作用在类上面,方法上面,属性上面
使用注解目的:简化 xml 配置
Spring针对Bean管理中创建对象提供注解
@Comment 普通的
@Service 建议用在业务逻辑层
@Controller 建议用在web层
@Repository 建议用在DAO层
这四个注解功能是一样的,都可以用来创建Bean实例,这是我们习惯把不同的注解用在不同的层中,以便调理清晰
基于注解方式的对象的创建 步骤
引入依赖 spring-aop.jar
开启组件扫描 - 引入context名称空间
1 2 3 4 5 6 7 8 9 10 11 12 13 14 15 16 <beans xmlns ="http://www.springframework.org/schema/beans" xmlns:xsi ="http://www.w3.org/2001/XMLSchema-instance" xmlns:p ="http://www.springframework.org/schema/p" xmlns:util ="http://www.springframework.org/schema/util" xmlns:context ="http://www.springframework.org/schema/context" xsi:schemaLocation ="http://www.springframework.org/schema/beans http://www.springframework.org/schema/beans/spring-beans.xsd http://www.springframework.org/schema/util http://www.springframework.org/schema/util/spring-util.xsd http://www.springframework.org/schema/context http://www.springframework.org/schema/context/spring-context.xsd" > <context:component-scan base-package ="com.Jancoyan.spring.Factory, com.Jancoyan.spring.bean" > </context:component-scan >
创建类,在类上面添加创建对象注解
1 2 3 4 5 6 @Component( value = "userService") public class Book { private String name; }
设置哪些注解进行扫描和不进行扫描:
1 2 3 4 5 6 7 8 9 10 11 12 13 14 15 16 17 18 <context:component-scan base-package ="com.atguigu" use-defaultfilters ="false" > <context:include-filter type ="annotation" expression ="org.springframework.stereotype.Controller" /></context:component-scan > <context:component-scan base-package ="com.atguigu" > <context:exclude-filter type ="annotation" expression ="org.springframework.stereotype.Controller" /></context:component-scan >
基于注解实现属性注入
@AutoWired:根据属性类型进行自动装配
把service和dao对象创建,在service和dao类添加创建对象注释
在service中注入dao对象,在service类添加dao类型属性,在属性上面使用注解(不需要添加set方法)
1 2 3 4 5 6 7 8 9 10 11 12 13 @Service("userService") public class UserService { @Autowired private UserDao userDao; public void add () { System.out.println("Service add..." ); userDao.test(); } }
@Qualifier:根据属性名称进行注入
应该和@AutoWire一起使用
1 2 3 4 5 6 7 8 9 10 11 12 13 14 15 16 17 18 19 20 21 22 23 @Component("userDao_1") public class UserDao implements Dao { @Override public void test () { System.out.println("UserDao...." ); } } @Component("userService") public class UserService { @Autowired @Qualifier(value = "userDao_1") private Dao userDao; public void add () { System.out.println("Service add..." ); userDao.test(); } }
@Resource:可以根据类型注入,也能根据属性名称注入
不建议使用 类型注入直接加@Resource
名称注入加上@Resource(name = “”) 名称写对象名
@Value:注入普通类型属性
1 2 3 4 5 @Service public class Book { @Value("<马保国>") private String name; }
完全注解开发
创建配置类,替代xml配置文件
@Configuration
1 2 3 4 5 6 7 8 9 2. 编写测试类java public static void main (String[] args) { ApplicationContext context = new AnnotationConfigApplicationContext (SpringConfig.class); UserService userService = context.getBean("userService" , UserService.class); userService.add(); }
ApplicationContext context = new AnnotationConfigApplicationContext(SpringConfig.class);
3. AOP 3.1 概念和原理 什么是 AOP ?面向切面编程(方面)
利用 AOP 可以对业务逻辑的各个部分进行隔离,从而使得 业务逻辑各部分之间的耦合度降低,提高程序的可重用性,同时提高了开发的效率。
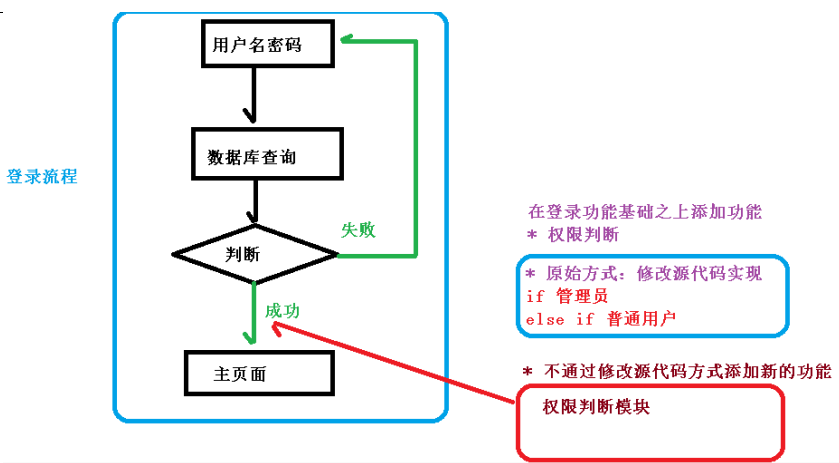
通俗描述:不通过修改源代码方式,在主干功能里面添加新功能
使用登录例子说明 AOP:
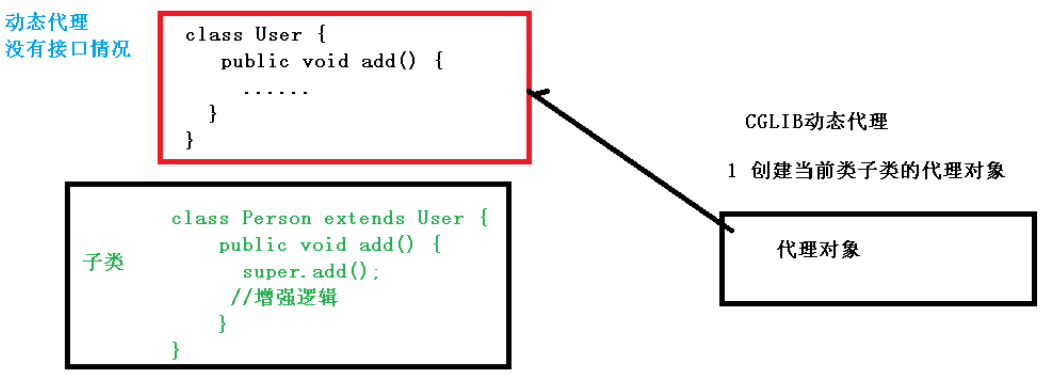
AOP底层使用动态代理
可以不掌握,我们有专门的封装类
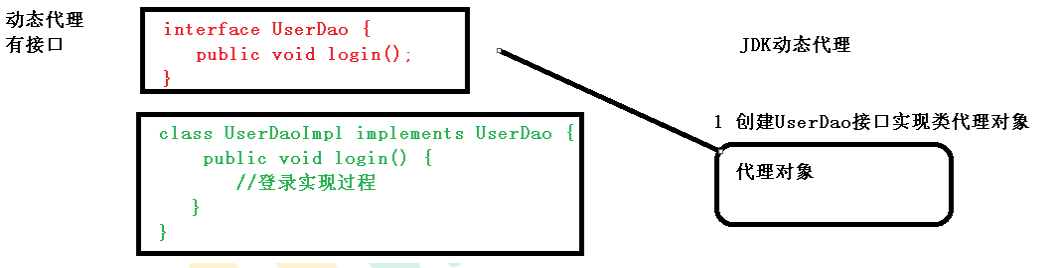
使用JDK动态代理,使用Proxy类里面的方法创建代理对象
调用newProxyInstance方法,其中有三个参数;1、类加载器;2、增强方法所在的类,这个类实现的接口,支持多个接口;3、实现接口InvocationHandler,创建代理对象,写增强的方法
创建接口,定义方法
创建接口实现类,实现方法
使用Proxy类创建接口代理对象
1 2 3 4 5 6 7 8 9 10 11 12 13 14 15 16 17 18 19 20 21 22 23 24 25 26 27 28 29 30 31 32 33 34 35 36 37 38 39 40 41 42 43 44 45 46 47 48 49 50 51 52 53 54 55 56 57 58 public interface UserDao { int add (int a, int b) ; void update (String id) ; } public class UserDaoImpl implements UserDao { @Override public int add (int a, int b) { return a + b; } @Override public void update (String id) { System.out.println("update..." ); } } public class JDKProxy { public static void main (String[] args) { Class[] interfaces = {UserDao.class}; UserDaoImpl userDao = new UserDaoImpl (); UserDao dao = (UserDao) Proxy.newProxyInstance(JDKProxy.class.getClassLoader(), interfaces, new UserDaoProxy (userDao)); int rst = dao.add(1 , 4 ); System.out.println(rst); } } class UserDaoProxy implements InvocationHandler { private Object object; public UserDaoProxy (Object obj) { this .object = obj; } @Override public Object invoke (Object proxy, Method method, Object[] args) throws Throwable { System.out.println("Pre... 当前执行的方法是" + method.getName() + " 传递的参数是..." + Arrays.toString(args)); Object res = method.invoke(object, args); if (method.getName().equals("add" )){ }else { } System.out.println("After... " + res); return res; } }
以上内容可以不掌握
Spring框架一般都是基于AspectJ实现AOP操作
什么是AspectJ?AspectJ不是Spring的组成部分,一般把AspectJ和Spring框架一起使用进行AOP操作
基于AspectJ实现AOP操作:
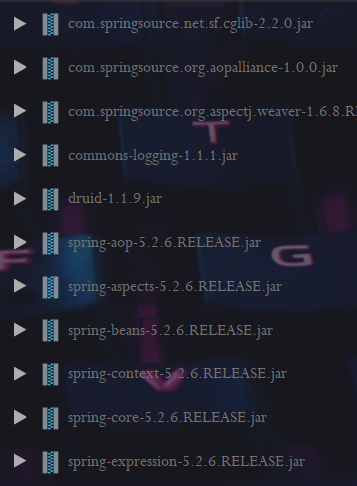
引入依赖:
作用:知道对哪个类里面的哪个方法进行增强
语法:execution([权限修饰符][返回类型][类全路径][方法名称]([参数列表]))
例1: com.Jancoyan.Spring.dao.UserDao里面的 add() 进行增强
* com.Jancoyan.Spring.dao.UserDao.add(..) * 表示所有的修饰符, .. 表示方法中的所有参数
例2: com.Jancoyan.Spring.dao.UserDao里面的 所有方法 进行增强
* com.Jancoyan.Spring.dao.UserDao.*(..) * 表示所有的修饰符, .. 表示方法中的所有参数
例3: com.Jancoyan.Spring.dao里面的 所有类的 所有方法 进行增强
* com.Jancoyan.Spring.dao.*.*(..) * 表示所有的修饰符, .. 表示方法中的所有参数
3.2 操作术语
连接点:类中能被增强的方法
切入点:实际被增强的方法
通知(增强):实际增强的部分
前置通知 、之前执行
后置通知 、之后执行
环绕通知 、之前和之后都执行
异常通知 、异常的时候才通知
最终通知 、类似于finally
切面:是一个动作。将通知应用到切入点的过程
3.3 AspectJ注解
创建类,在类中创建方法
创建增强类,编写增强逻辑
在增强类里面创建方法,让不同的方法代表不同的通知类型
进行通知的配置
在spring配置文件中开启注解扫描
引入名称空间context和aop
<context:component-scan base-package="com.Jancoyan.spring.Bean"></context:component-scan>
使用注解创建User和UserProxy对象(@Component)
在增强类上面添加注解 @Aspect
在spring配置文件中开启生成代理对象
<aop:aspectj-autoproxy></aop:aspectj-autoproxy>
配置不同类型的通知
在增强类的里面,在作为通知方法上面添加通知类型注解,使用切入点表达式配置
1 2 3 4 5 6 7 8 9 10 11 12 13 14 15 16 17 18 19 20 21 22 23 24 25 26 27 28 29 30 31 32 33 34 35 36 37 38 39 40 41 42 @Component public class User { public void add () { System.out.println("add...." ); } } @Component @Aspect public class UserProxy { @Before(value = "execution(* com.Jancoyan.spring.Bean.User.add(..))") public void before () { System.out.println("before..." ); } } <?xml version="1.0" encoding="UTF-8" ?> <beans xmlns="http://www.springframework.org/schema/beans" xmlns:context="http://www.springframework.org/schema/context" xmlns:aop="http://www.springframework.org/schema/aop" xmlns:xsi="http://www.w3.org/2001/XMLSchema-instance" xsi:schemaLocation="http://www.springframework.org/schema/beans http://www.springframework.org/schema/beans/spring-beans.xsd http://www.springframework.org/schema/aop http://www.springframework.org/schema/aop/spring-aop.xsd http://www.springframework.org/schema/context http://www.springframework.org/schema/context/spring-context.xsd" ><!-- 开启注解扫描--> <context:component-scan base-package ="com.Jancoyan.spring.Bean" ></context:component-scan> <!-- 开启Aspect生成代理对象--> <aop:aspectj-autoproxy></aop:aspectj-autoproxy> </beans> public class Test { public static void main (String[] args) { ApplicationContext context = new ClassPathXmlApplicationContext ("bean.xml" ); User user = context.getBean("user" , User.class); user.add(); } }
正常情况下不同类型的通知的输出时机:
环绕之前
before
add
环绕之后
after
afterReturning
【Afterthrowing】在抛出异常之前执行
如果有了异常,则执行顺序为:
环绕之前
before
after
afterthrowing
相同切入点的抽取:
1 2 3 4 5 6 7 8 9 10 @Pointcut(value = "execution(* com.atguigu.spring5.aopanno.User.add(..))") public void pointdemo () {} @Before(value = "pointdemo()") public void before () { System.out.println("before........." ); }
一个方法的多个增强类,设置他们的优先级 - 在增强类上面添加注解 @Order(数字) 数字越小越高
1 2 3 4 5 6 7 8 9 @Aspect @Component @Order(0) public class PersonProxy { @Before(value = "execution(* com.Jancoyan.spring.Bean.User.add(..))") public void before () { System.out.println("Person before,,," ); } }
3.4 AspectJ配置文件 实际开发中少使用,作为了解即可
1、创建两个类,增强类和被增强类,创建方法
2、在 spring 配置文件中创建两个类对象
1 2 3 <bean id ="book" class ="com.atguigu.spring5.aopxml.Book" > </bean > <bean id ="bookProxy" class ="com.atguigu.spring5.aopxml.BookProxy" > </bean >
3、在 spring 配置文件中配置切入点
1 2 3 4 5 6 7 8 9 10 11 <aop:config > <aop:pointcut id ="p" expression ="execution(* com.atguigu.spring5.aopxml.Book.buy(..))" /> <aop:aspect ref ="bookProxy" > <aop:before method ="before" pointcut-ref ="p" /> </aop:aspect > </aop:config >
4. JDBC Template 原理和概念 什么是 JdbcTemplate ?Spring 框架对 JDBC 进行封装,使用 JdbcTemplate 方便实现对数据库操作
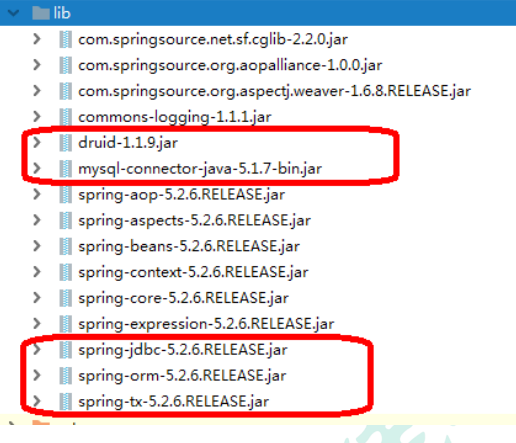
引入相关jar包
1 2 3 4 5 6 7 8 <bean id ="dataSource" class ="com.alibaba.druid.pool.DruidDataSource" destroy-method ="close" > <property name ="url" value ="jdbc:mysql:///user_db" /> <property name ="username" value ="root" /> <property name ="password" value ="root" /> <property name ="driverClassName" value ="com.mysql.jdbc.Driver" /> </bean >
配置jdbcTemplate对象,注入DataSource
1 2 3 4 5 <bean id ="jdbcTemplate" class ="org.springframework.jdbc.core.JdbcTemplate" > <property name ="dataSource" ref ="dataSource" > </property > </bean >
创建service类和dao类,在dao注入jdbcTemplate对象
1 2 <context:component-scan base-package ="com.atguigu" > </context:component-scan >
1 2 3 4 5 6 7 8 9 10 11 12 13 14 15 @Service public class BookService { @Autowired private BookDao bookDao; } @Repository public class BookDaoImpl implements BookDao { @Autowired private JdbcTemplate jdbcTemplate; }
单一操作 1 2 3 4 5 6 7 8 9 10 11 12 13 14 15 16 17 18 19 20 21 22 23 24 25 26 27 28 29 30 31 32 <?xml version="1.0" encoding="UTF-8" ?> <beans xmlns ="http://www.springframework.org/schema/beans" xmlns:context ="http://www.springframework.org/schema/context" xmlns:aop ="http://www.springframework.org/schema/aop" xmlns:xsi ="http://www.w3.org/2001/XMLSchema-instance" xsi:schemaLocation ="http://www.springframework.org/schema/beans http://www.springframework.org/schema/beans/spring-beans.xsd http://www.springframework.org/schema/aop http://www.springframework.org/schema/aop/spring-aop.xsd http://www.springframework.org/schema/context http://www.springframework.org/schema/context/spring-context.xsd" > <context:component-scan base-package ="com.Jancoyan.spring.Bean" > </context:component-scan > <bean id ="dataSource" class ="com.alibaba.druid.pool.DruidDataSource" destroy-method ="close" > <property name ="url" value ="jdbc:mysql://localhost:3306/spring" /> <property name ="username" value ="root" /> <property name ="password" value ="333" /> <property name ="driverClassName" value ="com.mysql.jdbc.Driver" /> </bean > <bean id ="jdbcTemplate" class ="org.springframework.jdbc.core.JdbcTemplate" > <property name ="dataSource" ref ="dataSource" > </property > </bean > <context:component-scan base-package ="com.Jancoyan.spring" > </context:component-scan > </beans >
增删改 使用 jdbcTemplate.update(sql, args);
第一个参数:sql语句
第二个参数:sql语句中占位符代表的元素,类型为 Object[]
1 2 3 4 5 6 7 8 9 10 11 12 13 14 15 16 17 18 19 20 21 22 23 24 25 26 27 28 29 30 31 32 33 34 35 36 37 38 39 40 41 42 43 44 45 46 47 48 49 50 51 52 53 54 55 56 57 58 59 60 61 62 63 64 65 66 67 68 69 public class Test { public static void main (String[] args) { ApplicationContext context = new ClassPathXmlApplicationContext ("bean.xml" ); Service service = context.getBean("service" , Service.class); Student student = new Student (); student.setId("123" ); student.setName("123" ); service.add(student); student.setName("hahaha" ); service.update(student); service.delete("123" ); } } @org .springframework.stereotype.Servicepublic class Service { @Autowired private BookDao bookDao; public void add (Student student) { bookDao.add(student); } public void delete (String id) { bookDao.delete(id); } public void update (Student student) { bookDao.update(student); } } @Repository public class BookDaoImpl implements BookDao { @Autowired private JdbcTemplate jdbcTemplate; @Override public void add (Student student) { String sql = "insert into t_student values(?, ?)" ; Object[] args = {student.getId(), student.getName()}; int rst = jdbcTemplate.update(sql, args); System.out.println("增加" + rst); } @Override public void delete (String id) { String sql = "delete from t_student where id = ?" ; int rst = jdbcTemplate.update(sql, id); System.out.println("删除" + rst); } @Override public void update (Student student) { String sql = "update t_student set name = ? where id = ?" ; Object[] args = {student.getName(), student.getId()}; int update = jdbcTemplate.update(sql, args); System.out.println("修改" + update); } }
返回某个值的查询 调用函数jdbcTemplate.queryForObject(String sql,Class class)
第一个参数:sql语句
第二个参数:返回结果的结果类
1 2 3 4 public int totalNumber () { String sql = "select count(*) from t_student" ; return jdbcTemplate.queryForObject(sql, Integer.class); }
返回对象的查询 调用函数 jdbcTemplate.queryForObject(String sql, new BeanPropertyRowMapper<返回类型>(返回类型Class), 参数列表)
第一个参数:sql语句
第二个参数:new BeanPropertyRowMapper<返回类型>(返回类型的Class)
第三个参数:sql中的占位符,类型为 Object[],可以没有
1 2 3 4 5 @Override public Student selectStudent (String id) { String sql = "select * from t_student where id = ?" ; return jdbcTemplate.queryForObject(sql, new BeanPropertyRowMapper <Student>(Student.class), id); }
返回集合的查询 调用函数 jdbcTemplate.query(sql, new BeanPropertyRowMapper<Student>(Student.class),参数列表)
第一个参数:sql语句
第二个参数:new BeanPropertyRowMapper<返回类型>(返回类型的Class)
第三个参数:sql中的占位符,类型为 Object[],可以没有
1 2 3 4 5 @Override public List<Student> selectStudent () { String sql = "select * from t_student" ; return jdbcTemplate.query(sql, new BeanPropertyRowMapper <Student>(Student.class)); }
批量操作 调用函数jdbcTemplate.batchUpdate(String sql, List<Object[]> batchArgs)
第一个参数为sql语句
第二个为sql中的参数, List<Object> 类型
1 2 3 4 5 6 7 8 9 10 11 12 13 14 15 16 17 18 19 20 21 22 23 @Override public void batchAddBook (List<Object[]> batchArgs) { String sql = "insert into t_book values(?,?,?)" ; int [] ints = jdbcTemplate.batchUpdate(sql, batchArgs); System.out.println(Arrays.toString(ints)); } @Override public void batchUpdateBook (List<Object[]> batchArgs) { String sql = "update t_book set username=?, ustatus=? where user_id=?" ; int [] ints = jdbcTemplate.batchUpdate(sql, batchArgs); System.out.println(Arrays.toString(ints)); } @Override public void batchDeleteBook (List<Object[]> batchArgs) { String sql = "delete from t_book where user_id=?" ; int [] ints = jdbcTemplate.batchUpdate(sql, batchArgs); System.out.println(Arrays.toString(ints)); }
5. Transaction Management 概述 web应用三层架构:web层、service层、dao层
建议将事务添加到service层中
有两种方式
总结: 使用注解声明式事务管理
底层使用到了AOP
事务管理的API
提供一个接口事务管理器,这个接口针对不同的框架实现了不同的实现类
注解声明式事务管理
在配置文件中配置事务管理器
1 2 3 4 5 <bean id ="transactionManager" class ="org.springframework.jdbc.datasource.DataSourceTransactionManager" > <property name ="dataSource" ref ="dataSource" > </property > </bean >
在配置文件中开启事务注解
开启名称空间 tx
1 2 3 4 5 6 7 8 9 10 11 12 13 <beans xmlns ="http://www.springframework.org/schema/beans" xmlns:xsi ="http://www.w3.org/2001/XMLSchema-instance" xmlns:context ="http://www.springframework.org/schema/context" xmlns:aop ="http://www.springframework.org/schema/aop" xmlns:tx ="http://www.springframework.org/schema/tx" xsi:schemaLocation ="http://www.springframework.org/schema/beans http://www.springframework.org/schema/beans/spring-beans.xsd http://www.springframework.org/schema/context http://www.springframework.org/schema/context/spring-context.xsd http://www.springframework.org/schema/aop http://www.springframework.org/schema/aop/spring-aop.xsd http://www.springframework.org/schema/tx http://www.springframework.org/schema/tx/spring-tx.xsd" >
开启事务注解
1 2 <tx:annotation-driven transaction-manager ="transactionManager" > </tx:annotation-driven >
在service类上面(获取service类的方法上面添加事务注解
@Transactional 可以添加到类上或者方法上
如果添加到类上,表示类中的所有的方法添加了事务
如果添加到了方法上,表示方法添加了事务
1 2 3 4 5 6 7 8 9 10 11 12 13 14 15 @Service @Transactional public class UserService { @Autowired private UserDao userDao; public void transfer () { userDao.reduceMoney(); System.out.println(10 /0 ); userDao.addMoney(); System.out.println("转账成功" ); } }
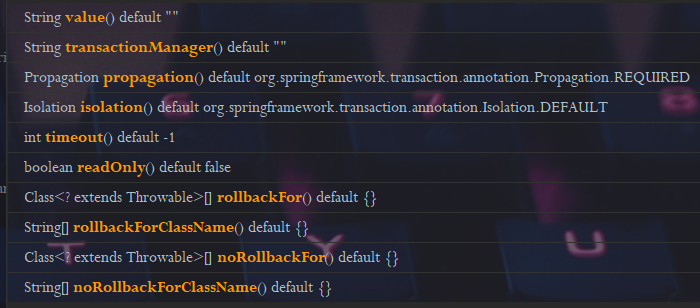
相关参数设置 在 @Transactional 中可以配置和事务相关的参数
1 @Transactional(propagation = Propagation.REQUIRED, isolation = Isolation.DEFAULT, timeout = 10, readOnly = true, rollbackFor = Exception.class)
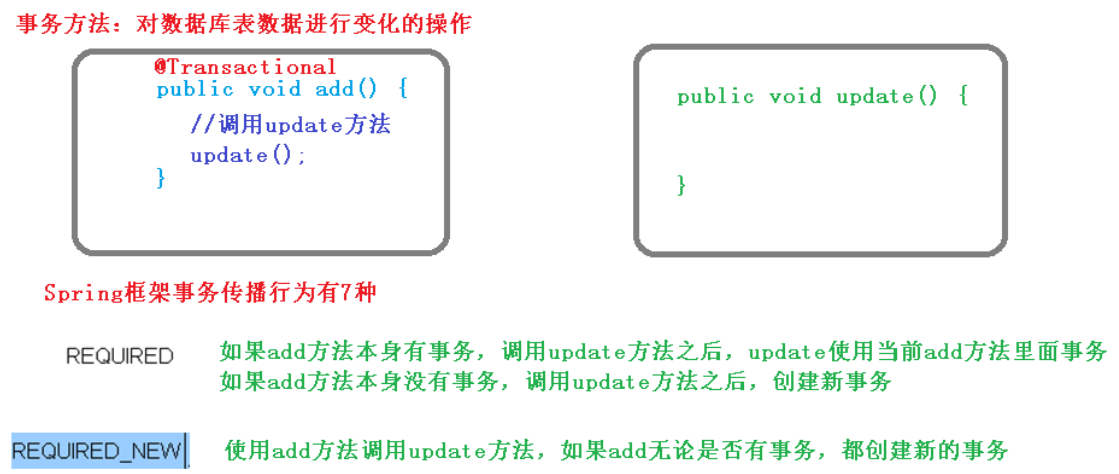
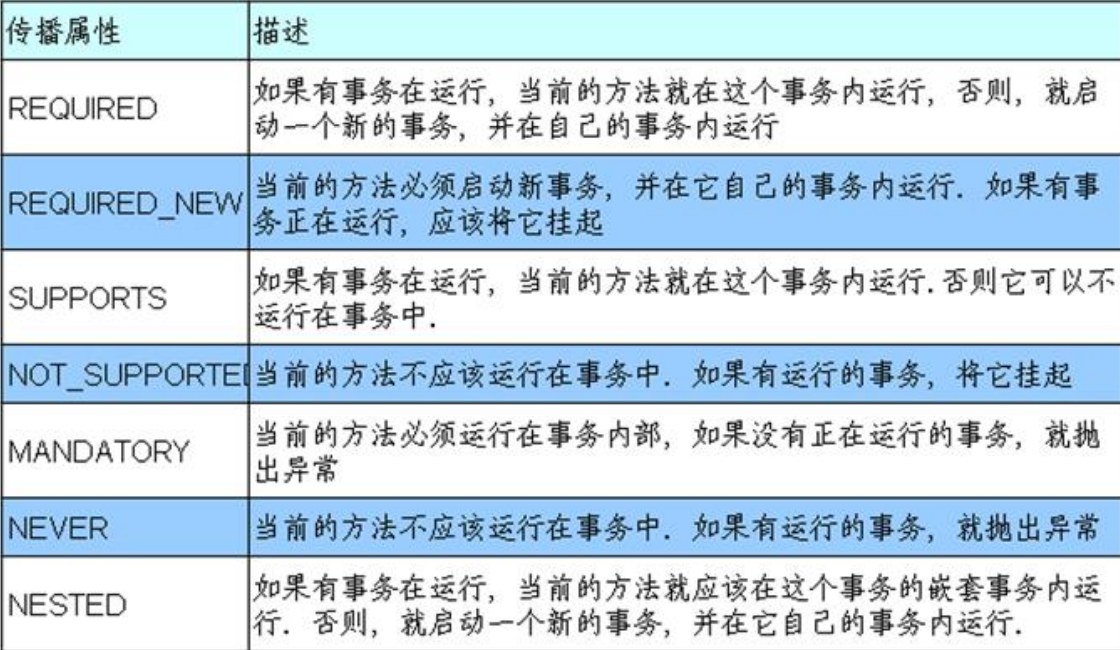
propagation:事务传播行为
记住前两个
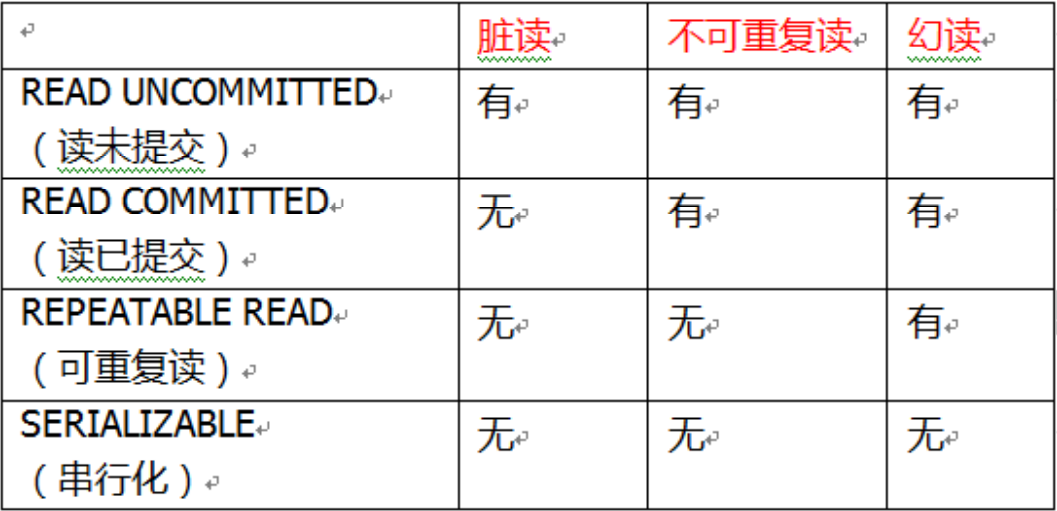
isolation:事务隔离级别 事务有特性成为隔离性,多事务操作之间不会产生影响。不考虑隔离性产生很多问题
有三个读问题:脏读、不可重复读、虚(幻)读
解决:通过设置事务隔离级别,解决读问题
timeout:超时时间 事务需要在一定时间内进行提交,如果不提交进行回滚
默认值是 -1 也就是不允许超时,设置时间以秒单位进行计算
readOnly:是否只读 读:查询操作,写:添加修改删除操作
readOnly 默认值 false,表示可以查询,可以添加修改删除操作
设置 readOnly 值是 true,设置成 true 之后,只能查询
rollbackFor:回滚 设置出现哪些异常进行事务回滚
noRoolbackFor:不回滚 设置出现哪些异常不进行事务回滚
完全注解开发 创建配置类,使用配置类替代xml配置文件
1 2 3 4 5 6 7 8 9 10 11 12 13 14 15 16 17 18 19 20 21 22 23 24 25 26 27 28 29 30 31 32 33 @Configuration @ComponentScan(basePackages = "com.Jancoyan") @EnableTransactionManagement public class TxConfig { @Bean public DruidDataSource getDruidDataSource () { DruidDataSource dataSource = new DruidDataSource (); dataSource.setDriverClassName("com.mysql.jdbc.Driver" ); dataSource.setUrl("jdbc:mysql:///user_db" ); dataSource.setUsername("root" ); dataSource.setPassword("root" ); return dataSource; } @Bean public JdbcTemplate getJdbcTemplate (DataSource dataSource) { JdbcTemplate jdbcTemplate = new JdbcTemplate (); jdbcTemplate.setDataSource(dataSource); return jdbcTemplate; } @Bean public DataSourceTransactionManager getDataSourceTransactionManager (DataSource dataSource) { DataSourceTransactionManager transactionManager = new DataSourceTransactionManager (); transactionManager.setDataSource(dataSource); return transactionManager; } }
创建对象的时候使用
1 ApplicationContext context = new AnnotationConfigApplicationContext ();
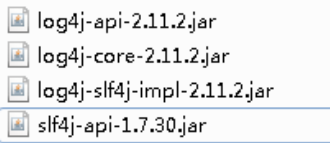
6. Spring 5 new features 自带通用的日志封装 Spring5整合了log4j2。
2. 创建log4j2.xml 配置文件,必须是这个名字,不能是别的。
1 2 3 4 5 6 7 8 9 10 11 12 13 14 15 16 17 18 19 20 21 22 23 24 <?xml version="1.0" encoding="UTF-8" ?> <configuration status ="INFO" > <appenders > <console name ="Console" target ="SYSTEM_OUT" > <PatternLayout pattern ="%d{yyyy-MM-dd HH:mm:ss.SSS} [%t] %- 5level %logger{36} - %msg%n" /> </console > </appenders > <loggers > <root level ="info" > <appender-ref ref ="Console" /> </root > </loggers > </configuration >
@Nullable 注解 @Nullable 注解可以使用在方法上面,属性上面,参数上面,表示方法返回可以为空,属性值可以 为空,参数值可以为空
核心容器支持函数式编程风格 1 2 3 4 5 6 7 8 9 10 11 12 13 @Test public void testGenericApplicationContext () { GenericApplicationContext context = new GenericApplicationContext (); context.refresh(); context.registerBean("user1" ,User.class,() -> new User ()); User user = (User)context.getBean("user1" ); System.out.println(user); }

 2. 创建log4j2.xml 配置文件,必须是这个名字,不能是别的。