SpringCloud
前言
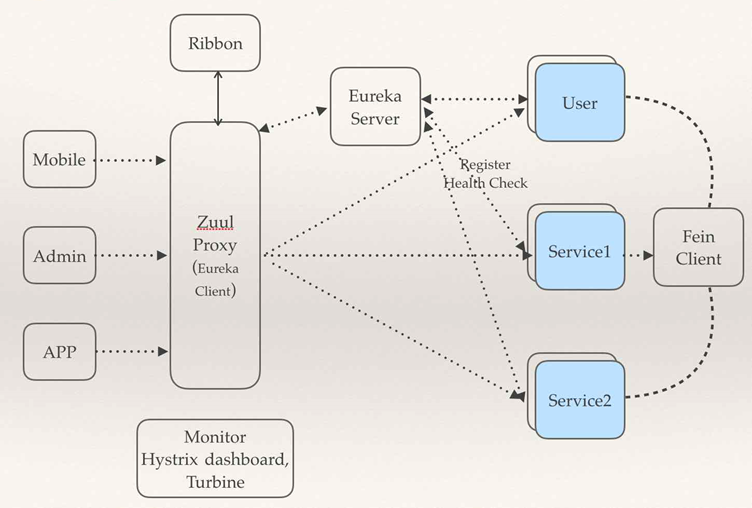
主要讲解Spring Cloud 五大组件
- 服务注册与发现——Netflix Eureka
- 负载均衡:
- 客户端负载均衡——Netflix Ribbon
- 服务端负载均衡:——Feign(其也是依赖于Ribbon,只是将调用方式RestTemplete 更改成Service 接口)
- 断路器——Netflix Hystrix
- 服务网关——Netflix Zuul
- 分布式配置——Spring Cloud Config
常见面试题:
1.1 什么是微服务?
1.2 微服务之间是如何独立通讯的?
1.3 SpringCloud 和 Dubbo有那些区别?
1.4 SpringBoot 和 SpringCloud,请谈谈你对他们的理解
1.5 什么是服务熔断?什么是服务降级?
1.6 微服务的优缺点分别是什么?说下你在项目开发中遇到的坑
1.7 你所知道的微服务技术栈有哪些?列举一二
1.8 Eureka和Zookeeper都可以提供服务注册与发现的功能,请说说两者的区别
微服务概述
什么是微服务?
微服务(Microservice Architecture) 是近几年流行的一种架构思想,关于它的概念很难一言以蔽之。
究竟什么是微服务呢?我们在此引用ThoughtWorks 公司的首席科学家 Martin Fowler 于2014年提出的一段话:
原文:https://martinfowler.com/articles/microservices.html
汉化:https://www.cnblogs.com/liuning8023/p/4493156.html
就目前而言,对于微服务,业界并没有一个统一的,标准的定义。
但通常而言,微服务架构是一种架构模式,或者说是一种架构风格,它体长将单一的应用程序划分成一组小的服务,每个服务运行在其独立的自己的进程内,服务之间互相协调,互相配置,为用户提供最终价值,服务之间采用轻量级的通信机制(HTTP)互相沟通,每个服务都围绕着具体的业务进行构建,并且能狗被独立的部署到生产环境中,另外,应尽量避免统一的,集中式的服务管理机制,对具体的一个服务而言,应该根据业务上下文,选择合适的语言,工具(Maven)对其进行构建,可以有一个非常轻量级的集中式管理来协调这些服务,可以使用不同的语言来编写服务,也可以使用不同的数据存储。
再来从技术维度角度理解下:
微服务化的核心就是将传统的一站式应用,根据业务拆分成一个一个的服务,彻底地去耦合,每一个微服务提供单个业务功能的服务,一个服务做一件事情,从技术角度看就是一种小而独立的处理过程,类似进程的概念,能够自行单独启动或销毁,拥有自己独立的数据库。
微服务与微服务架构
微服务
强调的是服务的大小,它关注的是某一个点,是具体解决某一个问题/提供落地对应服务的一个服务应用,狭义的看,可以看作是IDEA中的一个个微服务工程,或者Moudel。IDEA 工具里面使用Maven开发的一个个独立的小Moudel,它具体是使用SpringBoot开发的一个小模块,专业的事情交给专业的模块来做,一个模块就做着一件事情。强调的是一个个的个体,每个个体完成一个具体的任务或者功能。
微服务架构
一种新的架构形式,Martin Fowler 于2014年提出。
微服务架构是一种架构模式,它体长将单一应用程序划分成一组小的服务,服务之间相互协调,互相配合,为用户提供最终价值。每个服务运行在其独立的进程中,服务与服务之间采用轻量级的通信机制**(如HTTP)互相协作,每个服务都围绕着具体的业务进行构建,并且能够被独立的部署到生产环境中,另外,应尽量避免统一的,集中式的服务管理机制,对具体的一个服务而言,应根据业务上下文,选择合适的语言、工具(如Maven)**对其进行构建。
微服务优缺点
优点
- 单一职责原则
- 每个服务足够内聚,足够小,代码容易理解,这样能聚焦一个指定的业务功能或业务需求;
- 开发简单,开发效率高,一个服务可能就是专一的只干一件事;
- 微服务能够被小团队单独开发,这个团队只需2-5个开发人员组成;
- 微服务是松耦合的,是有功能意义的服务,无论是在开发阶段或部署阶段都是独立的;
- 微服务能使用不同的语言开发;
- 易于和第三方集成,微服务允许容易且灵活的方式集成自动部署,通过持续集成工具,如jenkins,Hudson,bamboo;
- 微服务易于被一个开发人员理解,修改和维护,这样小团队能够更关注自己的工作成果,无需通过合作才能体现价值;
- 微服务允许利用和融合最新技术;
- 微服务只是业务逻辑的代码,不会和HTML,CSS,或其他的界面混合;
- 每个微服务都有自己的存储能力,可以有自己的数据库,也可以有统一的数据库;
缺点
- 开发人员要处理分布式系统的复杂性;
- 多服务运维难度,随着服务的增加,运维的压力也在增大;
- 系统部署依赖问题;
- 服务间通信成本问题;
- 数据一致性问题;
- 系统集成测试问题;
- 性能和监控问题;
微服务技术栈有哪些?
| 微服务技术条目 | 落地技术 |
|---|---|
| 服务开发 | SpringBoot、Spring、SpringMVC等 |
| 服务配置与管理 | Netfix公司的Archaius、阿里的Diamond等 |
| 服务注册与发现 | Eureka、Consul、Zookeeper等 |
| 服务调用 | Rest、PRC、gRPC |
| 服务熔断器 | Hystrix、Envoy等 |
| 负载均衡 | Ribbon、Nginx等 |
| 服务接口调用(客户端调用服务的简化工具) | Fegin等 |
| 消息队列 | Kafka、RabbitMQ、ActiveMQ等 |
| 服务配置中心管理 | SpringCloudConfig、Chef等 |
| 服务路由(API网关) | Zuul等 |
| 服务监控 | Zabbix、Nagios、Metrics、Specatator等 |
| 全链路追踪 | Zipkin、Brave、Dapper等 |
| 数据流操作开发包 | SpringCloud Stream(封装与Redis,Rabbit,Kafka等发送接收消息) |
| 时间消息总栈 | SpringCloud Bus |
| 服务部署 | Docker、OpenStack、Kubernetes等 |
为什么选择SpringCloud作为微服务架构
- 选型依据
- 整体解决方案和框架成熟度
- 社区热度
- 可维护性
- 学习曲线
- 当前各大IT公司用的微服务架构有那些?
- 阿里:dubbo+HFS
- 京东:JFS
- 新浪:Motan
- 当当网:DubboX
…
SpringCloud入门概述
SpringCloud和SpringBoot的关系
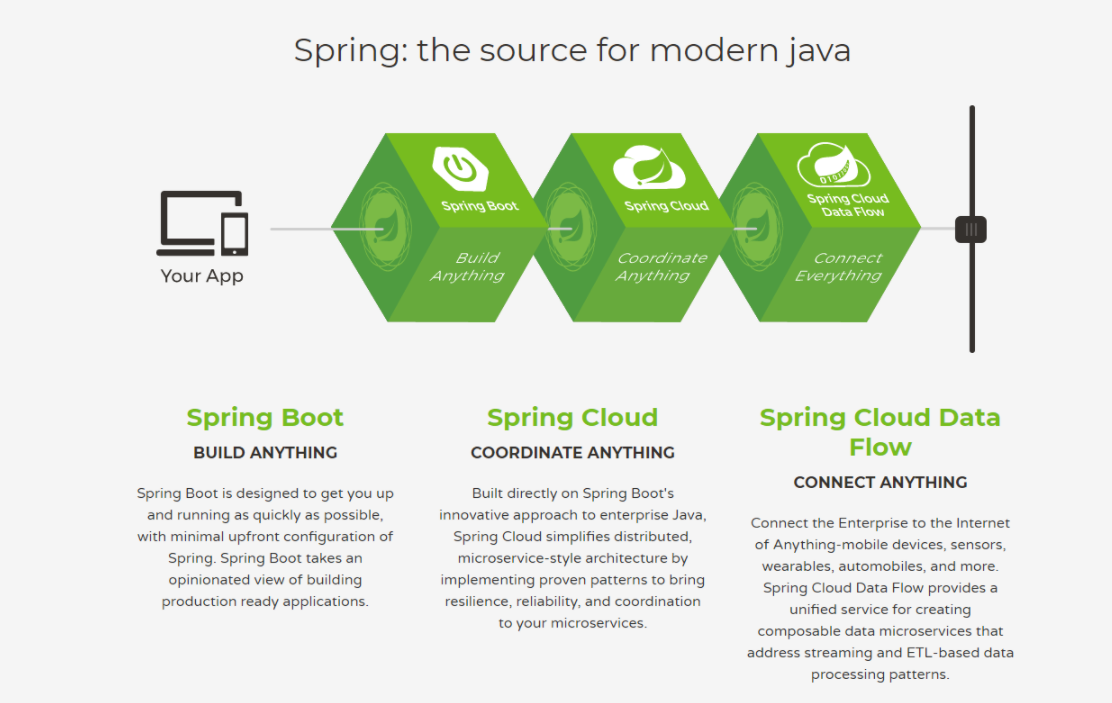
SpringBoot专注于开苏方便的开发单个个体微服务;
SpringCloud是关注全局的微服务协调整理治理框架,它将SpringBoot开发的一个个单体微服务,整合并管理起来,为各个微服务之间提供:配置管理、服务发现、断路器、路由、为代理、事件总栈、全局锁、决策竞选、分布式会话等等集成服务;
SpringBoot可以离开SpringCloud独立使用,开发项目,但SpringCloud离不开SpringBoot,属于依赖关系;
SpringBoot专注于快速、方便的开发单个个体微服务,SpringCloud关注全局的服务治理框架;
Dubbo 和 SpringCloud技术选型
- 分布式+服务治理Dubbo 目前成熟的互联网架构,应用服务化拆分 + 消息中间件
- Dubbo 和 SpringCloud对比 可以看一下社区活跃度:
https://github.com/spring-cloud
对比:
| Dubbo | SpringCloud | |
|---|---|---|
| 服务注册中心 | Zookeeper | Spring Cloud Netfilx Eureka |
| 服务调用方式 | RPC | REST API |
| 服务监控 | Dubbo-monitor | Spring Boot Admin |
| 断路器 | 不完善 | Spring Cloud Netfilx Hystrix |
| 服务网关 | 无 | Spring Cloud Netfilx Zuul |
| 分布式配置 | 无 | Spring Cloud Config |
| 服务跟踪 | 无 | Spring Cloud Sleuth |
| 消息总栈 | 无 | Spring Cloud Bus |
| 数据流 | 无 | Spring Cloud Stream |
| 批量任务 | 无 | Spring Cloud Task |
最大区别:Spring Cloud 抛弃了Dubbo的RPC通信,采用的是基于HTTP的REST方式
严格来说,这两种方式各有优劣。虽然从一定程度上来说,后者牺牲了服务调用的性能,但也避免了上面提到的原生RPC带来的问题。而且REST相比RPC更为灵活,服务提供方和调用方的依赖只依靠一纸契约,不存在代码级别的强依赖,这个优点在当下强调快速演化的微服务环境下,显得更加合适。
品牌机和组装机的区别
社区支持与更新力度的区别
总结:二者解决的问题域不一样:Dubbo的定位是一款RPC框架,而SpringCloud的目标是微服务架构下的一站式解决方案。
SpringCloud能干嘛?
Distributed/versioned configuration 分布式/版本控制配置
Service registration and discovery 服务注册与发现
Routing 路由
Service-to-service calls 服务到服务的调用
Load balancing 负载均衡配置
Circuit Breakers 断路器
Distributed messaging 分布式消息管理
…
SpringCloud下载
官网:http://projects.spring.io/spring-cloud/
版本号有点特别:
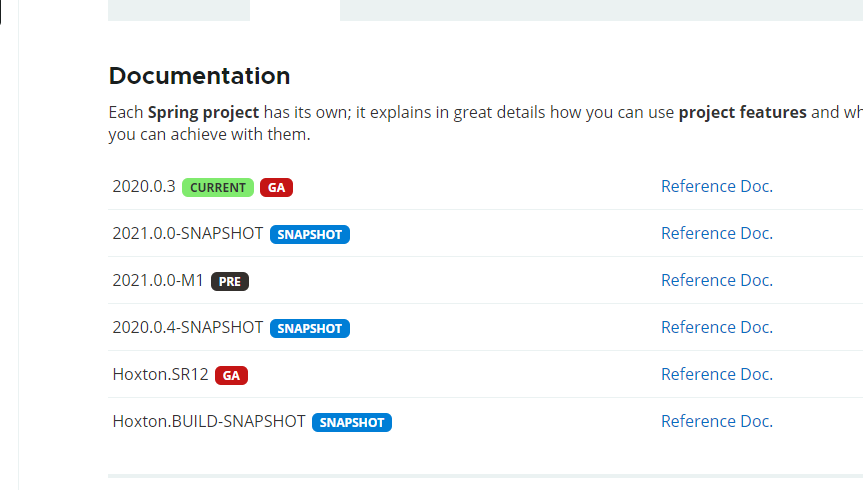
SpringCloud没有采用数字编号的方式命名版本号,而是采用了伦敦地铁站的名称,同时根据字母表的顺序来对应版本时间顺序,比如最早的Realse版本:Angel,第二个Realse版本:Brixton,然后是Camden、Dalston、Edgware,目前最新的是Hoxton SR4 CURRENT GA通用稳定版。
自学参考书:
SpringCloud Netflix 中文文档:https://springcloud.cc/spring-cloud-netflix.html
SpringCloud 中文API文档(官方文档翻译版):https://springcloud.cc/spring-cloud-dalston.html
SpringCloud中国社区:http://springcloud.cn/
SpringCloud中文网:https://springcloud.cc
SpringCloud REST学习环境搭建:服务提供者
介绍
我们会使用一个Dept部门模块做一个微服务通用案例Consumer消费者(Client)通过REST调用Provider提供者(Server)提供的服务。
回顾Spring,SpringMVC,Mybatis等以往学习的知识。
Maven的分包分模块架构复习。
1 | 一个简单的Maven模块结构是这样的: |
一个父工程带着多个Moudule子模块
MicroServiceCloud父工程(Project)下初次带着3个子模块(Module)
- microservicecloud-api 【封装的整体entity/接口/公共配置等】
- microservicecloud-consumer-dept-80 【服务提供者】
- microservicecloud-provider-dept-8001 【服务消费者】
版本选择
大版本说明:
| SpringBoot | SpringCloud | 关系 |
|---|---|---|
| 1.2.x | Angel版本(天使) | 兼容SpringBoot1.2x |
| 1.3.x | Brixton版本(布里克斯顿) | 兼容SpringBoot1.3x,也兼容SpringBoot1.4x |
| 1.4.x | Camden版本(卡姆登) | 兼容SpringBoot1.4x,也兼容SpringBoot1.5x |
| 1.5.x | Dalston版本(多尔斯顿) | 兼容SpringBoot1.5x,不兼容SpringBoot2.0x |
| 1.5.x | Edgware版本(埃奇韦尔) | 兼容SpringBoot1.5x,不兼容SpringBoot2.0x |
| 2.0.x | Finchley版本(芬奇利) | 兼容SpringBoot2.0x,不兼容SpringBoot1.5x |
| 2.1.x | Greenwich版本(格林威治) |
开发版本关系:
| spring-boot-starter-parent | spring-cloud-dependencles | ||
|---|---|---|---|
| 版本号 | 发布日期 | 版本号 | 发布日期 |
| 1.5.2.RELEASE | 2017-03 | Dalston.RC1 | 2017-x |
| 1.5.9.RELEASE | 2017-11 | Edgware.RELEASE | 2017-11 |
| 1.5.16.RELEASE | 2018-04 | Edgware.SR5 | 2018-10 |
| 1.5.20.RELEASE | 2018-09 | Edgware.SR5 | 2018-10 |
| 2.0.2.RELEASE | 2018-05 | Fomchiey.BULD-SNAPSHOT | 2018-x |
| 2.0.6.RELEASE | 2018-10 | Fomchiey-SR2 | 2018-10 |
| 2.1.4.RELEASE | 2019-04 | Greenwich.SR1 | 2019-03 |
创建父项目
从此以后我们的maven不使用模板,都是new 普通项目
- 新建父工程项目springcloud,切记Packageing是pom模式
- 主要是定义POM文件,将后续各个子模块公用的jar包等统一提取出来,类似一个抽象父类
父工程目录结构:
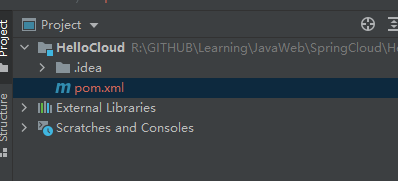
初始的pom文件:
1 |
|
新建子模块
创建普通maven模块,把我们创建的父项目作为parent
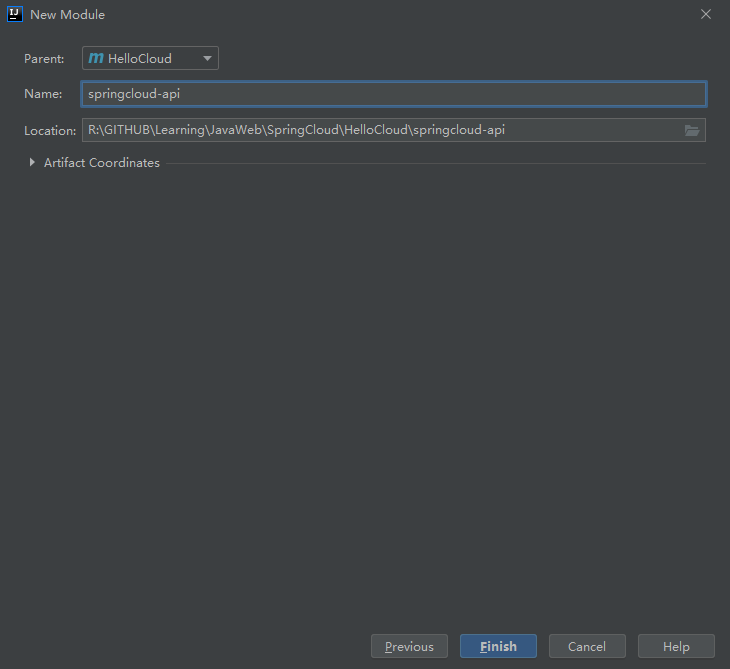
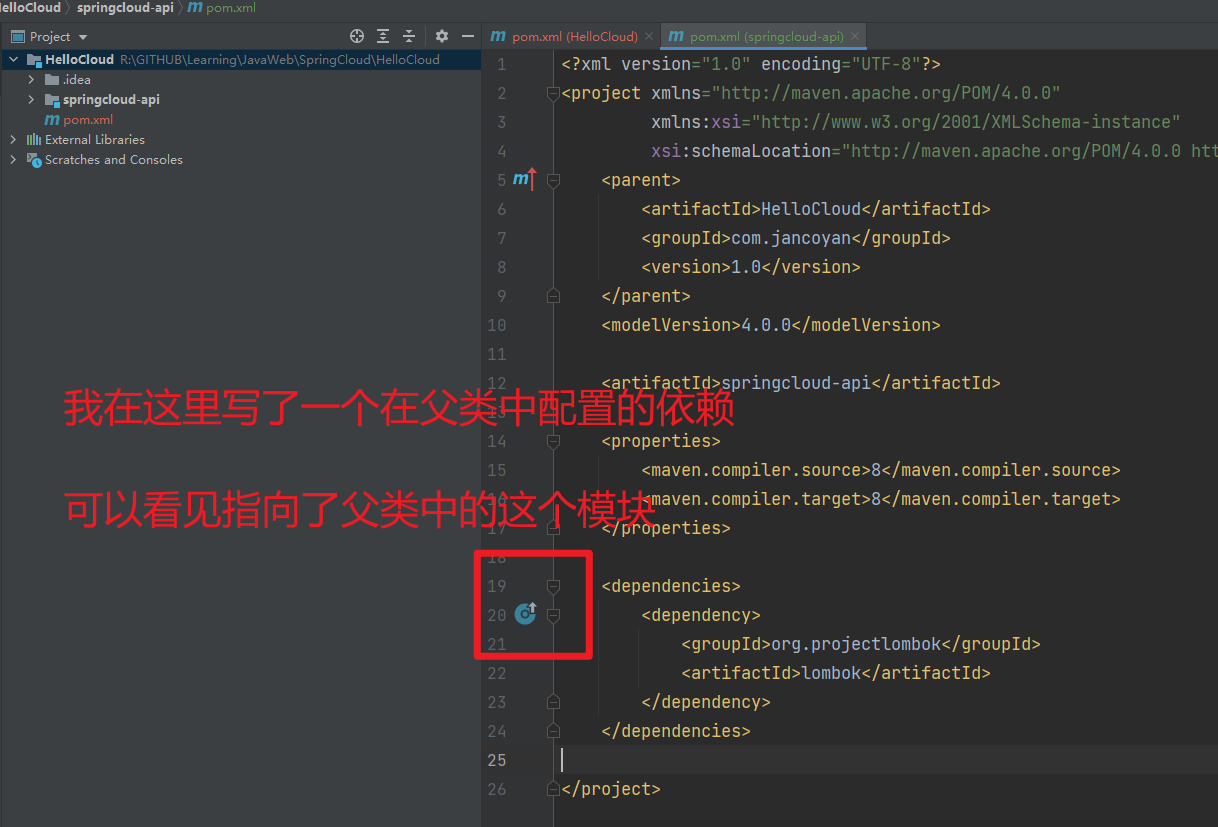
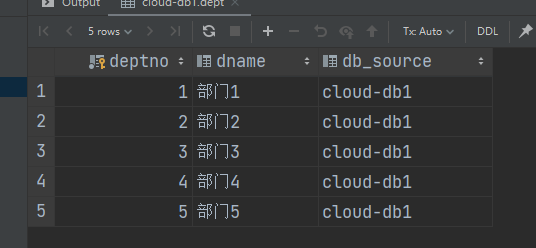
我们创建一个数据库 cloud-db1
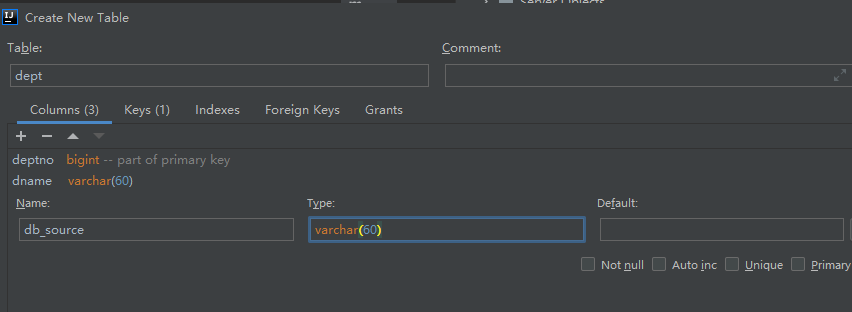
在这个数据库中创建一个表。
字段中有一个db_source,是什么意思?
我们后来肯定有数据库1数据库2数据库3…
这个字段表示我们这个数据是从哪个数据库中读取出来的。
向数据库中插入数据:
1 | insert into dept (dname, db_source) |
创建实体类:
1 | /** |
这个模块就写到这里,假设我们这个模块只做提供api这一件事。
下面我们来创建一个新的模块。
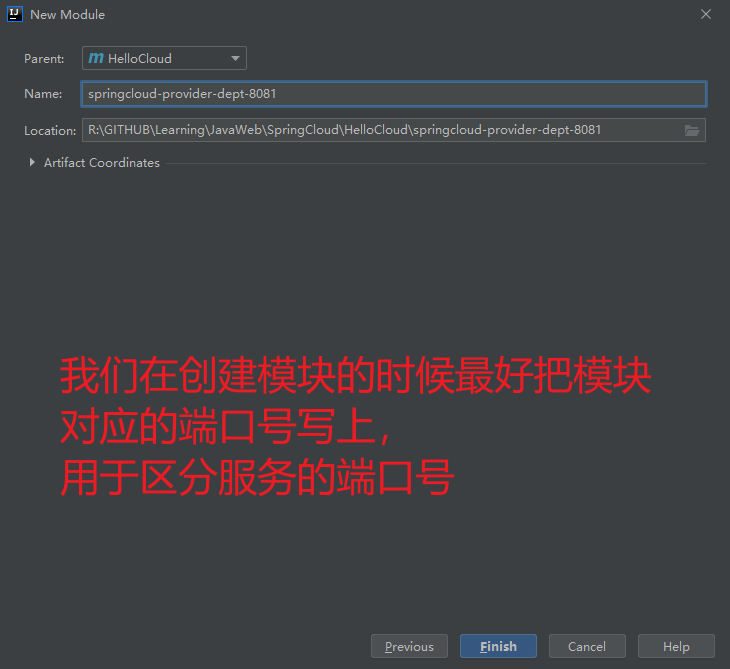
下面配置这个模块,假设这个模块负责提供dept实体类的提供
我们要先拿到dept的实体类
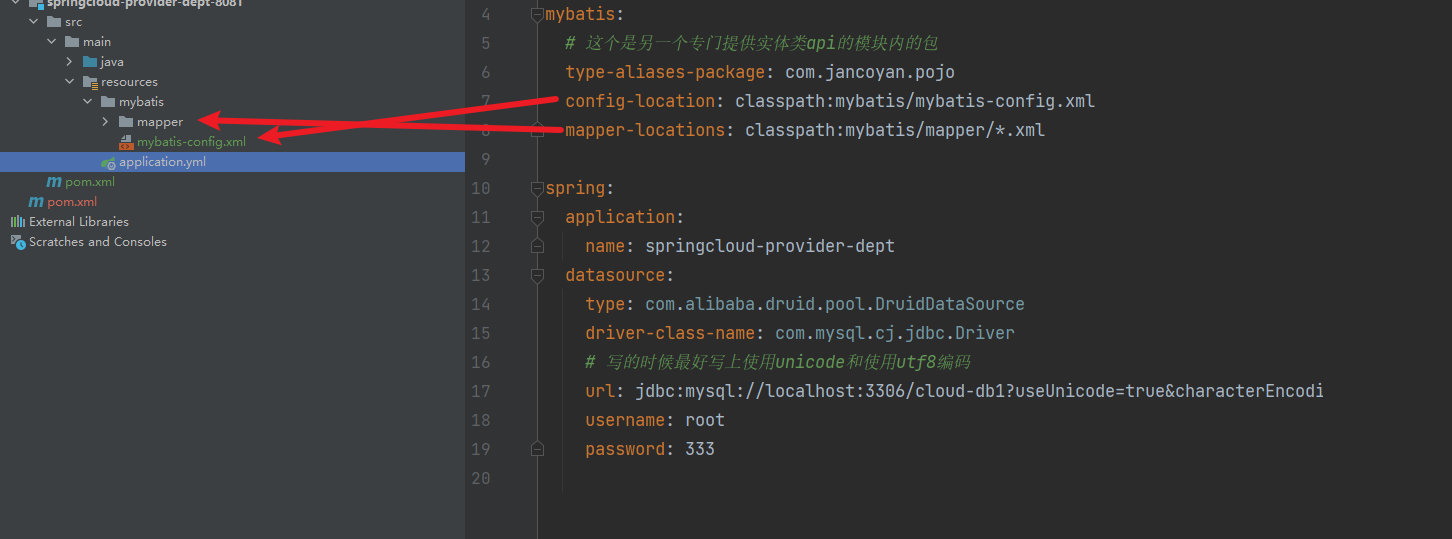
pom配置文件:
1 | GITHUB\Learning\JavaWeb\SpringCloud\HelloCloud\springcloud-provider-dept-8081\pom.xml |
再写一个模块 - 消费者模块
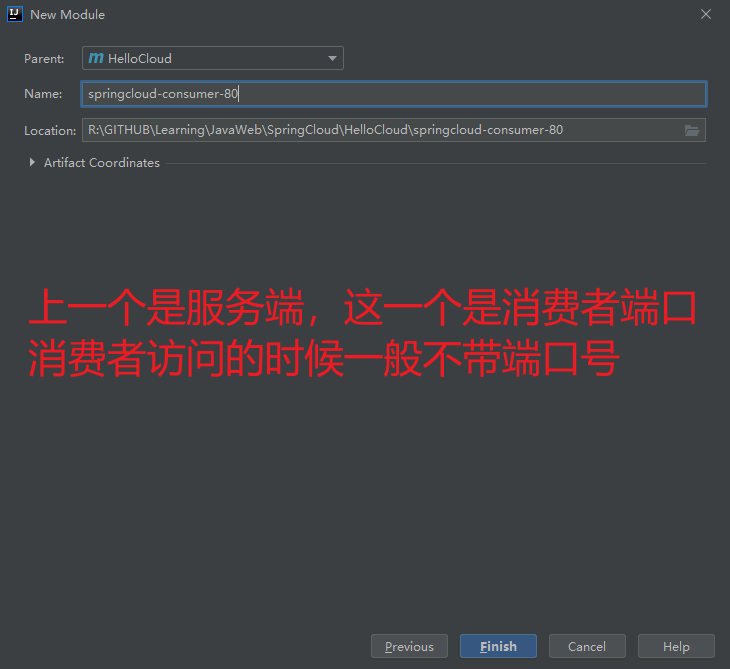
消费者不需要连接数据库,所以只需要实体类 + web的依赖,只和前端打交道
1 |
|
至此,基本的框架就搭建好了。
Eureka 服务注册中心
什么是Eureka
Netflix在涉及Eureka时,遵循的就是API原则.
Eureka是Netflix的有个子模块,也是核心模块之一。Eureka是基于REST的服务,用于定位服务,以实现云端中间件层服务发现和故障转移,服务注册与发现对于微服务来说是非常重要的,有了服务注册与发现,只需要使用服务的标识符,就可以访问到服务,而不需要修改服务调用的配置文件了,功能类似于Dubbo的注册中心,比如Zookeeper.
原理理解
Eureka基本的架构
Springcloud 封装了Netflix公司开发的Eureka模块来实现服务注册与发现 (对比Zookeeper).
Eureka采用了C-S的架构设计,EurekaServer作为服务注册功能的服务器,他是服务注册中心.
而系统中的其他微服务,使用Eureka的客户端连接到EurekaServer并维持心跳连接。这样系统的维护人员就可以通过EurekaServer来监控系统中各个微服务是否正常运行,Springcloud 的一些其他模块 (比如Zuul) 就可以通过EurekaServer来发现系统中的其他微服务,并执行相关的逻辑.
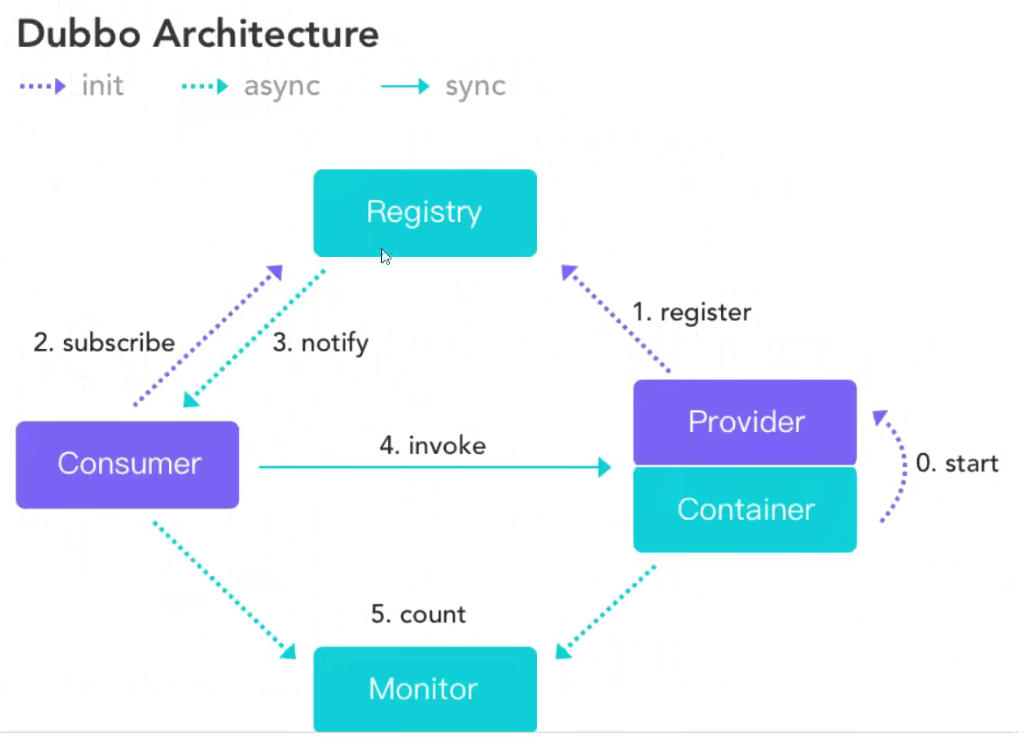
dubbo架构
基本部署
创建项目 eureka
依赖配置文件:
1 |
|
配置文件:
1 | server: |
启动类:
1 | package com.jancoyan; |
启动这个类之后就可以在我们配置的地址中访问eureka中心
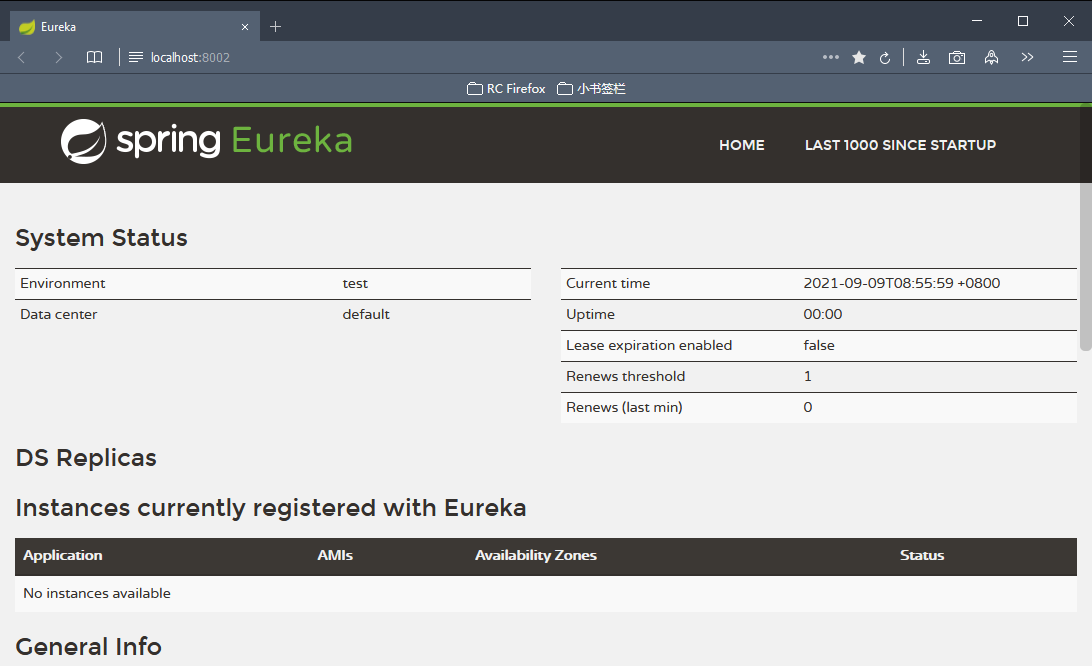
服务注册信息配置
将dept-provider的信息注册到eureka中,让eureka能够检测dept-provider的信息:
HelloCloud\springCloud-provider-dept-8001\pom.xml 中追加以下信息:
1 | <!-- eureka--> |
配置这个服务的注册信息
HelloCloud\springCloud-provider-dept-8001\src\main\resources\application.yml 中追加以下信息
1 | eureka: |
在启动类上添加注解
1 |
|
启动两个服务进行测试:
先启动eureka
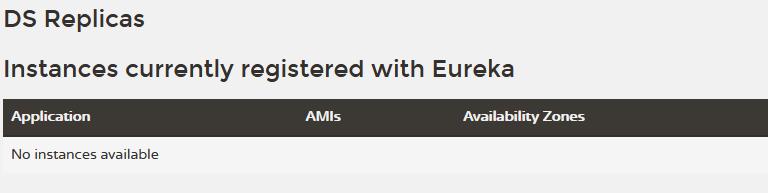
打开配置的客户端中心,显示没有实例注册进来
再启动 dept-provider
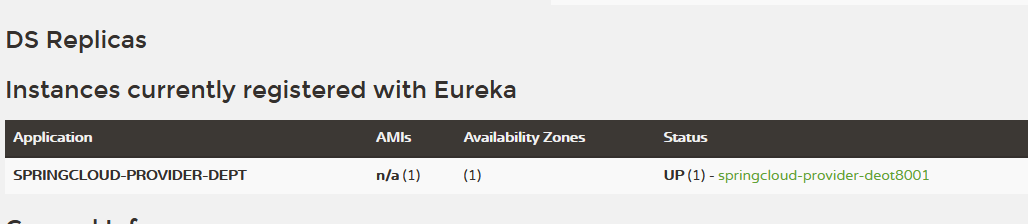
dept注册进来了,我这个status字段中的绿色字体是 这个服务的yml文件中的 eureka.instance.instance-id 字段,配置这个可以改这个名字
点击绿色连接可以这个服务的监控信息信息页面,但是这个给页面需要配置:
HelloCloud\springCloud-provider-dept-8001\pom.xml 中追加以下信息:
1 | <!-- actuator完善监控信息--> |
HelloCloud\springCloud-provider-dept-8001\src\main\resources\application.yml 中追加以下信息
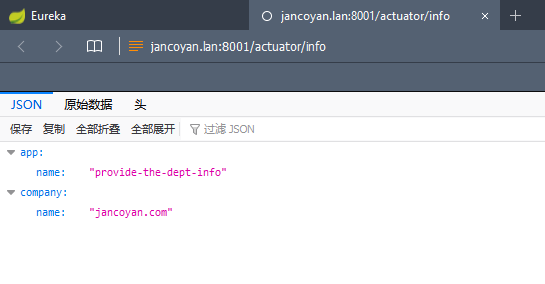
1 | info: |
表示配置了app名字和公司名称
当我们再次点击了这个之后,得到了这样的信息:
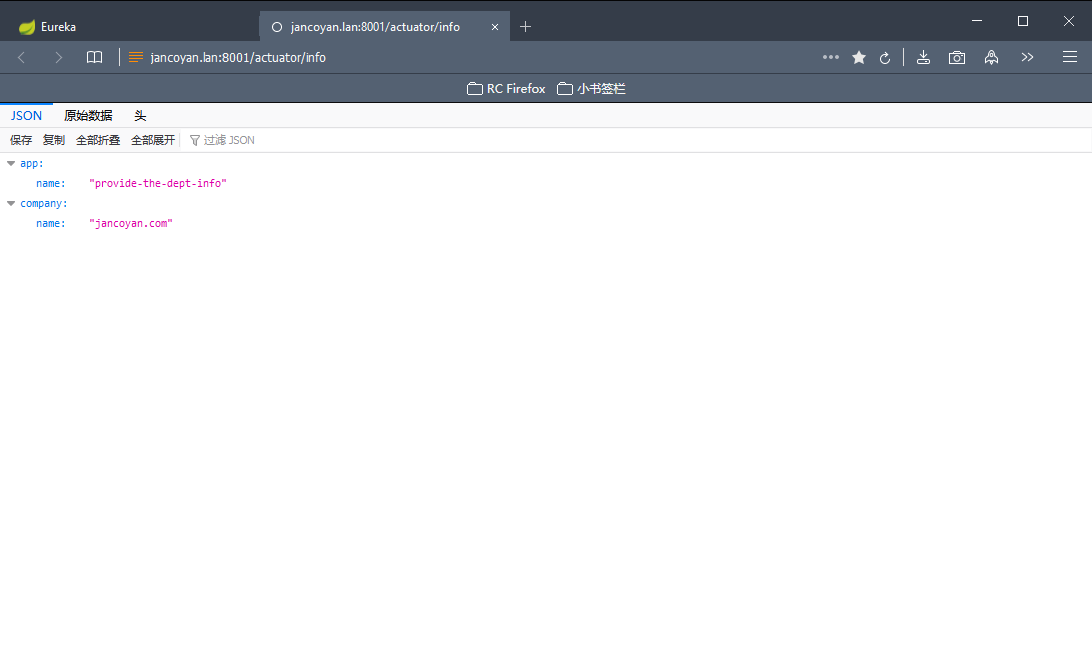
这个机制可以向别人展示这个微服务是作什么的。
这里面的字段都是自己定义和编写的。
自我保护机制
当检测到微服务宕掉的时候,会发出这样的警告
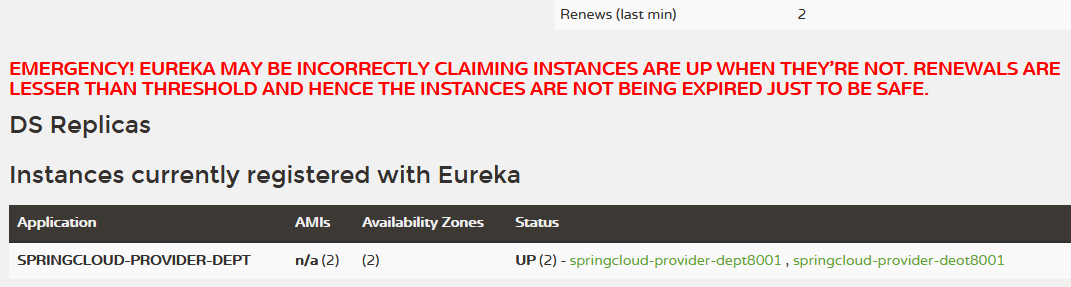
一句话总结就是:某时刻某一个微服务不可用,eureka不会立即清理,依旧会对该微服务的信息进行保存!
- 默认情况下,当eureka server在一定时间内没有收到实例的心跳,便会把该实例从注册表中删除(默认是90秒),但是,如果短时间内丢失大量的实例心跳,便会触发eureka server的自我保护机制,比如在开发测试时,需要频繁地重启微服务实例,但是我们很少会把eureka server一起重启(因为在开发过程中不会修改eureka注册中心),当一分钟内收到的心跳数大量减少时,会触发该保护机制。可以在eureka管理界面看到Renews threshold和Renews(last min),当后者(最后一分钟收到的心跳数)小于前者(心跳阈值)的时候,触发保护机制,会出现红色的警告:EMERGENCY!EUREKA MAY BE INCORRECTLY CLAIMING INSTANCES ARE UP WHEN THEY’RE NOT.RENEWALS ARE LESSER THAN THRESHOLD AND HENCE THE INSTANCES ARE NOT BEGING EXPIRED JUST TO BE SAFE.从警告中可以看到,eureka认为虽然收不到实例的心跳,但它认为实例还是健康的,eureka会保护这些实例,不会把它们从注册表中删掉。
- 该保护机制的目的是避免网络连接故障,在发生网络故障时,微服务和注册中心之间无法正常通信,但服务本身是健康的,不应该注销该服务,如果eureka因网络故障而把微服务误删了,那即使网络恢复了,该微服务也不会重新注册到eureka server了,因为只有在微服务启动的时候才会发起注册请求,后面只会发送心跳和服务列表请求,这样的话,该实例虽然是运行着,但永远不会被其它服务所感知。所以,eureka server在短时间内丢失过多的客户端心跳时,会进入自我保护模式,该模式下,eureka会保护注册表中的信息,不在注销任何微服务,当网络故障恢复后,eureka会自动退出保护模式。自我保护模式可以让集群更加健壮。
- 但是我们在开发测试阶段,需要频繁地重启发布,如果触发了保护机制,则旧的服务实例没有被删除,这时请求有可能跑到旧的实例中,而该实例已经关闭了,这就导致请求错误,影响开发测试。所以,在开发测试阶段,我们可以把自我保护模式关闭,只需在eureka server配置文件中加上如下配置即可:eureka.server.enable-self-preservation=false【不推荐关闭自我保护机制】
获取该微服务的一些信息(团队开发用到)
控制器中增加一个属性和一个方法
1 | HelloCloud\springCloud-provider-dept-8001\src\main\java\com\jancoyan\controller\DeptController.java |
在启动类中添加注解
1 |
|
重启服务,发送请求,获取信息
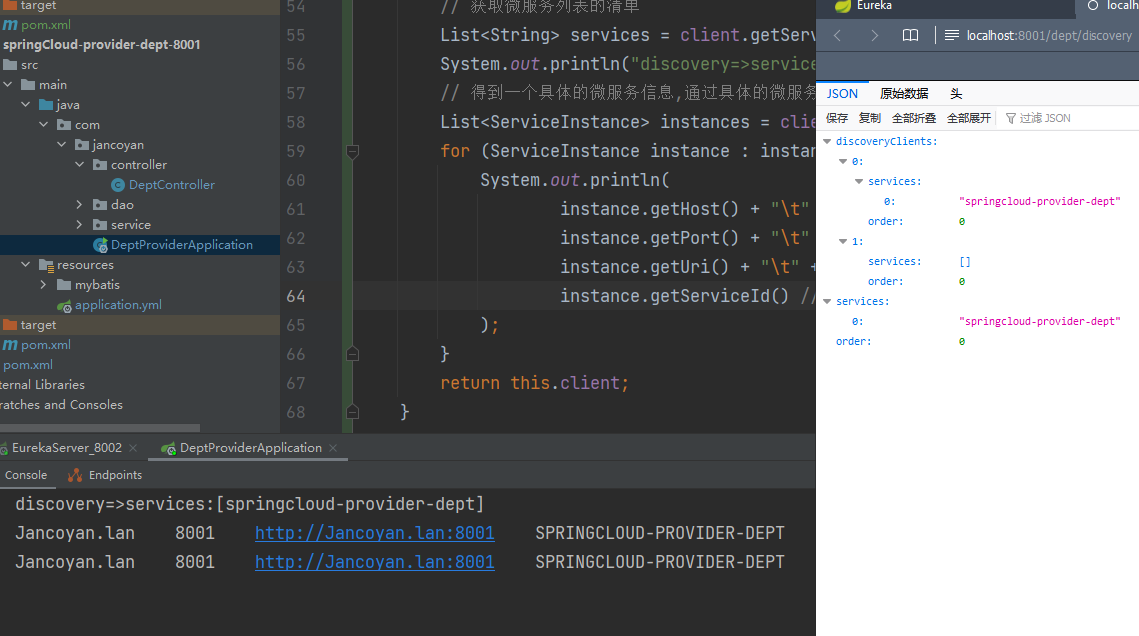
可以获取到一些信息。
【架构师】Eureka集群配置
先创建3个Eureka模拟集群
配置 pom.xml 和 application.xml 和主启动类
- pom.xml 把依赖复制过去
- application 把所有东西复制过去之后改一下端口
- 主启动类改一下名字(是为了更好的理解这个思想, 不一定真的要配置)
修改本机的域名映射:C:\Windows\System32\drivers\etc\hosts
将这三个eureka的域名映射到本机,也就是说访问三个地址都是访问本机
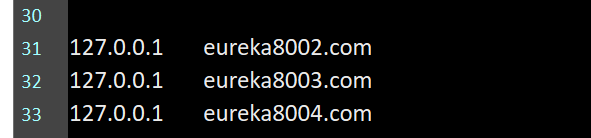
如果不能保存,就重写
接下来我们让三个eureka服务相互关联,也就是让 每一个eureka都和其他2个eureka相关联。
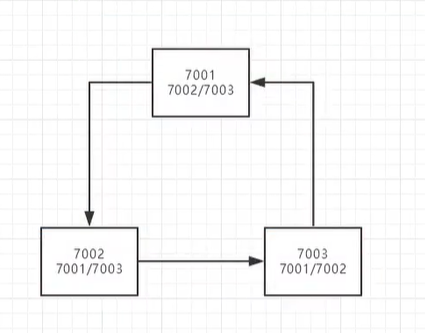
编写每一个的配置文件:
1 | SpringCloud\HelloCloud\springCloud-eureka-8002\src\main\resources\application.yml |
dept-provider 服务配置
1 | SpringCloud\HelloCloud\springCloud-provider-dept-8001\src\main\resources\application.yml |
把这个服务配置到三个eureka中
1 | eureka: |
启动三个eureka和一个服务。
可以看出三个都和其他两个连接起来了,并且我们的服务同时挂到了三个上面
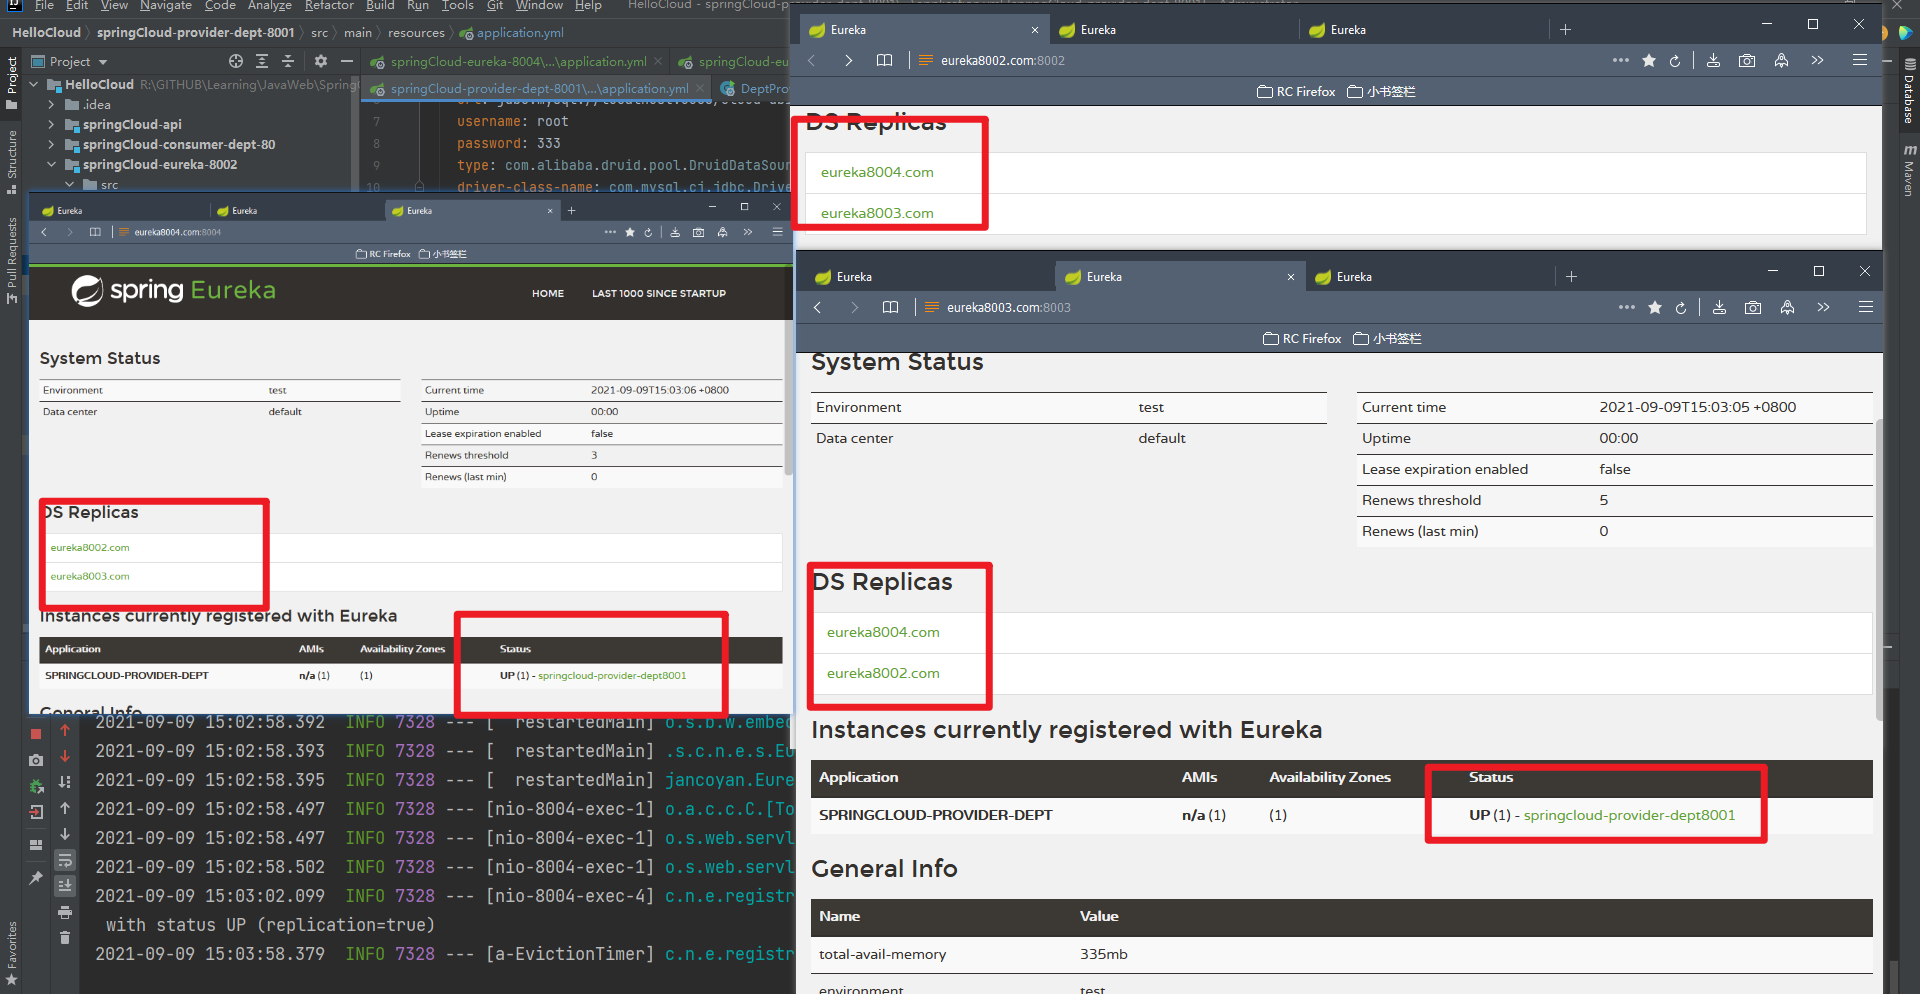
这样以来如果有一个eureka断掉了,还可以用其他两个服务。
关闭34,2还可以用
对比和ZooKeeper的区别
RDBMS (MySQL\Oracle\sqlServer) ===> ACID
NoSQL (Redis\MongoDB) ===> CAP
ACID是什么?
- A (Atomicity) 原子性
- C (Consistency) 一致性
- I (Isolation) 隔离性
- D (Durability) 持久性
CAP是什么?
- C (Consistency) 强一致性
- A (Availability) 可用性
- P (Partition tolerance) 分区容错性
- CAP的三进二:CA、AP、CP
CAP理论的核心
- 一个分布式系统不可能同时很好的满足一致性,可用性和分区容错性这三个需求
- 根据CAP原理,将NoSQL数据库分成了满足CA原则,满足CP原则和满足AP原则三大类
- CA:单点集群,满足一致性,可用性的系统,通常可扩展性较差
- CP:满足一致性,分区容错的系统,通常性能不是特别高
- AP:满足可用性,分区容错的系统,通常可能对一致性要求低一些
作为分布式服务注册中心,Eureka比Zookeeper好在哪里?
- 著名的CAP理论指出,一个分布式系统不可能同时满足C (一致性) 、A (可用性) 、P (容错性),由于分区容错性P再分布式系统中是必须要保证的,因此我们只能再A和C之间进行权衡。
Zookeeper 保证的是 CP —> 满足一致性,分区容错的系统,通常性能不是特别高
Eureka 保证的是 AP —> 满足可用性,分区容错的系统,通常可能对一致性要求低一些
Zookeeper保证的是CP
当向注册中心查询服务列表时,我们可以容忍注册中心返回的是几分钟以前的注册信息,但不能接收服务直接down掉不可用。也就是说,服务注册功能对可用性的要求要高于一致性。但zookeeper会出现这样一种情况,当master节点因为网络故障与其他节点失去联系时,剩余节点会重新进行leader选举。问题在于,选举leader的时间太长,30-120s,且选举期间整个zookeeper集群是不可用的,这就导致在选举期间注册服务瘫痪。在云部署的环境下,因为网络问题使得zookeeper集群失去master节点是较大概率发生的事件,虽然服务最终能够恢复,但是,漫长的选举时间导致注册长期不可用,是不可容忍的。
Eureka保证的是AP
Eureka看明白了这一点,因此在设计时就优先保证可用性。Eureka各个节点都是平等的,几个节点挂掉不会影响正常节点的工作,剩余的节点依然可以提供注册和查询服务。而Eureka的客户端在向某个Eureka注册时,如果发现连接失败,则会自动切换至其他节点,只要有一台Eureka还在,就能保住注册服务的可用性,只不过查到的信息可能不是最新的,除此之外,Eureka还有之中自我保护机制,如果在15分钟内超过85%的节点都没有正常的心跳,那么Eureka就认为客户端与注册中心出现了网络故障,此时会出现以下几种情况:
- Eureka不在从注册列表中移除因为长时间没收到心跳而应该过期的服务
- Eureka仍然能够接受新服务的注册和查询请求,但是不会被同步到其他节点上 (即保证当前节点依然可用)
- 当网络稳定时,当前实例新的注册信息会被同步到其他节点中
因此,Eureka可以很好的应对因网络故障导致部分节点失去联系的情况,而不会像zookeeper那样使整个注册服务瘫痪
Ribbon:基于客户端的负载均衡
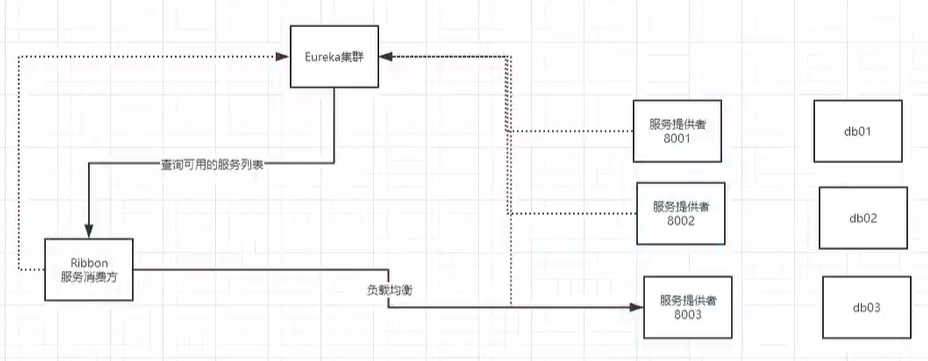
创建3个服务,3个服务的名称是一样的,才能实现负载均衡
Ribbon从Eureka集群中查询可用的服务列表,通过这个列表实现负载均衡,判断自己需要连接哪一个服务器。